
Have you tried to upload SVG images on your WordPress installation but were unable to? In this guide, we’ll show you how to safely do so.
Overview
Vector image formats (like SVGs) are a great alternative to PNGs if you’re planning to display logos, icons, and infographics across multiple devices and screen resolutions.
However, you’ll find that uploading SVGs to your WordPress Media Library isn’t a straightforward process like it is for PNGs or JPEGs.
WordPress doesn’t have native support for SVGs due to security concerns.
This is because SVGs aren’t a typical image format like JPEGs or PNGs (raster images); they are a form of vector image that comprise of code to define lines, curves, color, etc. Naturally, anything using code can be manipulated, thus SVGs can potentially be used for malicious purposes.
In this article, we’ll talk about why this is the case and how you can easily and safely use SVGs on your WordPress site.
Why Can’t I Upload SVGs To My WordPress Media Library?
When you try to directly upload an SVG file to WordPress, you’ll likely see an error with the message: “Sorry this file type is not permitted for security reasons.”
This is mostly down to the intricacies of the SVG format.

Basically, SVG is an open-standard vector image format stored in XML format.
SVGs can be simple static images, or dynamic and interactive with hover states and clickable areas (Example).
To allow SVGs to be dynamic and interactive, a scripting language (e.g., JavaScript) can be used, as well as linking to external resources like CSS, fonts and other documents.
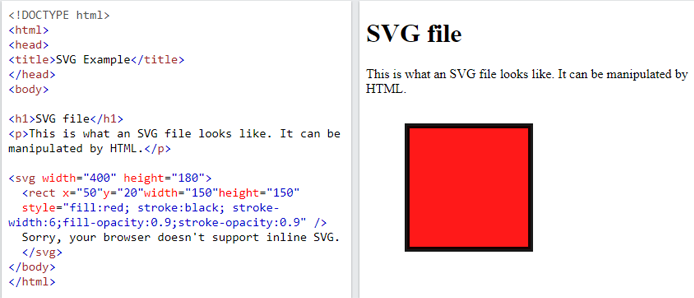
When browsers encounter such files, they may automatically* parse and execute any CSS/JavaScript embedded in these files. If the script happens to contain malicious code, it places you and your visitor’s computers at risk.
If you run websites where users or other authors can upload SVG files, it opens up your site to potential XML entity attacks, brute force attacks, and other nefarious hacking attempts.
This is why WordPress doesn’t support SVGs out-of-the-box. In fact, there have been ongoing discussions around providing native support for SVGs in WordPress since 2013.
However, that doesn’t mean you can’t use SVGs at all in your WordPress site. There are some methods to safely use SVGs in your WordPress site.
* Depends on how SVGs are inserted onto your page. Refer to the table in this external resource to know which methods support execution of external JavaScript.
How to Make SVGs Safe
There are many plugins and manual methods available to facilitate uploading SVGs on WordPress. However, simply downloading any free plugin and using them to upload SVGs isn’t necessarily the best solution as they may not address the underlying security concerns associated with SVGs.
Before doing anything with SVGs, it’s a good practice to ensure that your source of SVG files is a trusted one – that means restricting access so that only you or another trusted person can contribute SVGs on your WordPress site.
Moreover, in order to make sure your SVG files are truly safe, it’s recommended that you first sanitize them (i.e., clean up the code to prevent errors, suspicious code, and other security issues).
There are multiple ways to do this:
Using a Sanitization Plugin
You can use WordPress plugins to sanitize your SVG files. There are many different plugins available, both free and paid.
When deciding which plugin to use, consider what features the plugin offers, such as sanitizing SVG files, restricting SVG uploads to administrators, and any other safety or functionality-related features.
One free plugin you can use is SVG Support. This plugin not only sanitizes your SVG files but also allows you to restrict SVG uploads to administrators only.

Alternatively, you can also consider using the Safe SVG plugin. Note that the free version of this plugin doesn’t restrict uploads to administrators only, so use it cautiously.
No matter which plugin you choose to utilize, make sure to always test the plugin to verify that website functionality doesn’t break. If you find that the plugin isn’t compatible with your WordPress site, consider using alternatives.
Using an Open-Source Sanitization Library
You can also use an open-source library to sanitize your SVG files. While we can’t vouch for their efficacy, you can find some well-known examples online, such as DOMPurify and svg-sanitizer, the latter provided by the same person who created the Safe SVG plugin.
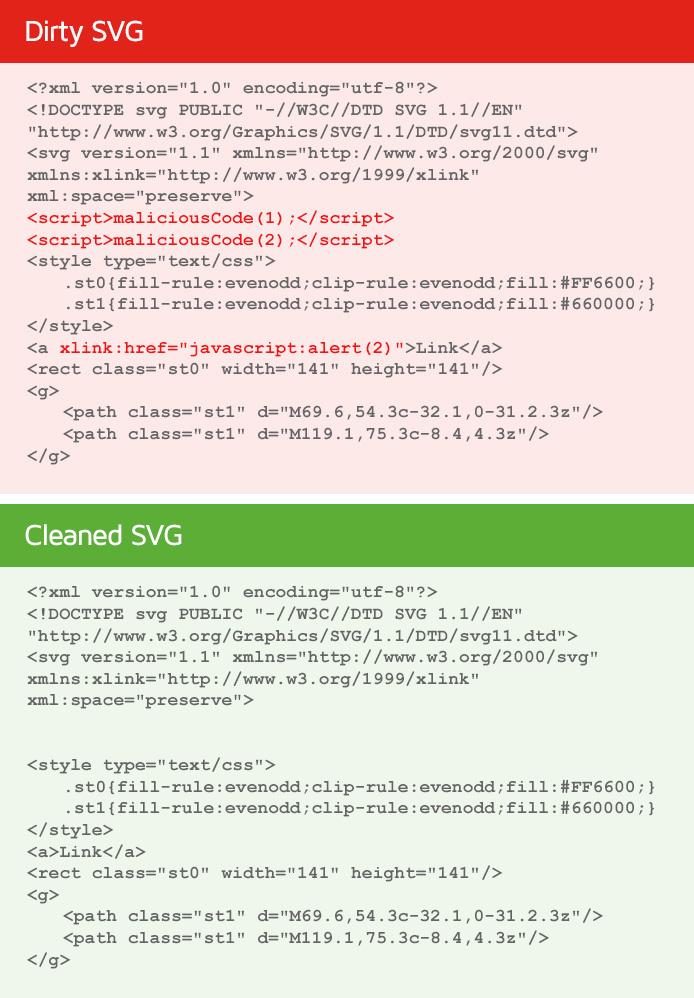
These libraries help provide some protection against cyber attacks by doing things like encoding data, filtering and validating strings, etc.
Manually Cleaning up the Code
If you’re well-versed in XML coding, you can manually clean up the code yourself.
This is also helpful for reducing the SVG markup (i.e., number of lines of code) when typically creating SVG files with graphic design software (e.g., Illustrator, Sketch, Inkscape, etc.).
Keep in mind that the larger an XML file is, the longer it will take to load so cleaning up the code is also beneficial for performance.
Check out these external resources to learn more:
How to Enable SVG Uploads
There are multiple ways to enable SVG uploads on your WordPress site:
Using Plugins
The plugins listed above not only sanitize your SVG files, but allow you to directly upload them onto your WordPress site.
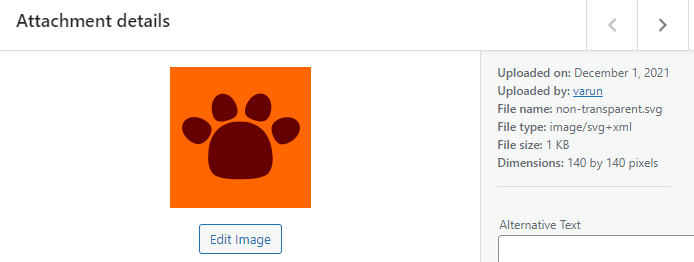
You should be able to directly upload them onto your Media Library, and even preview the images, just like you would for any JPEG or PNG.
Note that using plugins is the easiest way to upload SVGs on your WordPress site.
Using Page Builders
Page builders provide a drag and drop interface to structure your page’s layout and add content. Some page builders also enable you to upload SVG images for icons.
For example, Elementor allows you to upload SVG images (or use their icon library) through widgets.
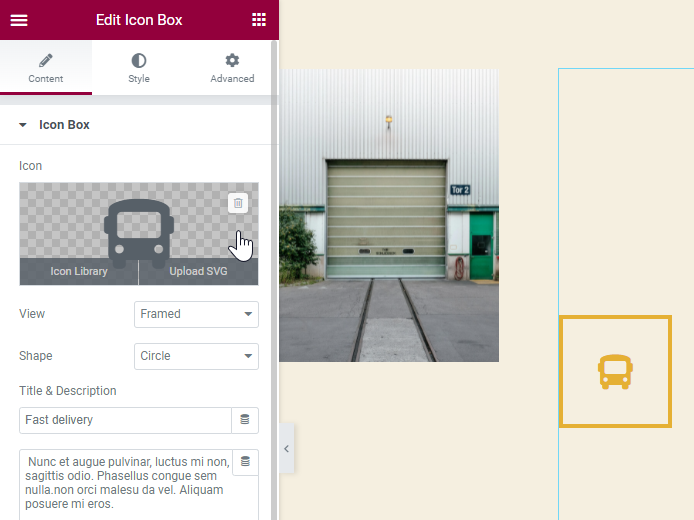
Note that you may see a warning about SVG security when you do this for the first time, and may need to enable the unfiltered file uploads option to facilitate SVG uploads.
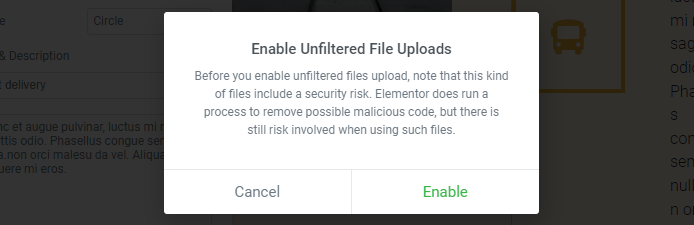
Some page builders even sanitize the code themselves, but we can neither confirm or deny if they’re 100% clean. If you use a page builder for your site, consider using it to upload SVGs but make sure you weigh the risks involved, especially if you’re unsure about the source of the SVG files.
Manually Enabling SVG Support
If you prefer, you can also manually enable SVG support on WordPress by modifying your site’s functions.php file. Note that this method requires admin rights.
Follow the steps below:
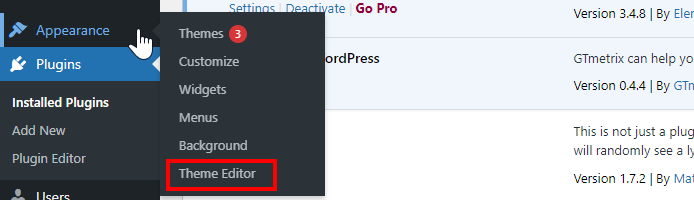
Step 1) Click on the Theme Editor Settings
On your WordPress sidebar, hover over Appearance and click on “Theme Editor”.
Step 2) Click on the Theme Functions (functions.php) file
You should find this on the right hand side of the Theme Editor settings.

Step 3) Add the following code to your functions.php file
Scroll down to the bottom and add the below code:
// Allow SVG
add_filter( 'wp_check_filetype_and_ext', function($data, $file, $filename, $mimes) {
  global $wp_version;
  if ( $wp_version !== '4.7.1' ) {
     return $data;
  }
  $filetype = wp_check_filetype( $filename, $mimes );
  return [
      'ext'             => $filetype['ext'],
      'type'            => $filetype['type'],
      'proper_filename' => $data['proper_filename']
  ];
}, 10, 4 );
function cc_mime_types( $mimes ){
  $mimes['svg'] = 'image/svg+xml';
  return $mimes;
}
add_filter( 'upload_mimes', 'cc_mime_types' );
function fix_svg() {
  echo '';
}
add_action( 'admin_head', 'fix_svg' );
Click on Update File when you’re done to save the changes. You should now be able to upload an SVG file to your Media Library.
Note that you will need to repeat this procedure for any themes you wish to have support for SVGs.
Remember to only use SVGs from trusted sources and/or sanitized SVG files if you decide to manually enable SVG support on WordPress.
Code errors may break your site
Make sure that you paste the code as-is in your functions.php file. Any mistakes (missing/redundant characters, erroneous syntax, etc.) in your code can break your site so we recommend testing this functionality on a staging/development site first. If you’re not confident working with code, we suggest using the plugin or page builder methods.
How to Insert SVGs on Your Page
Now that you can upload sanitized SVGs directly on to your WordPress Library, you can simply insert them on your WordPress page (or post) just like you usually would for any other raster image.
In your WordPress Editor, you can click on Add Media, select the desired image, and click “Insert into page”.
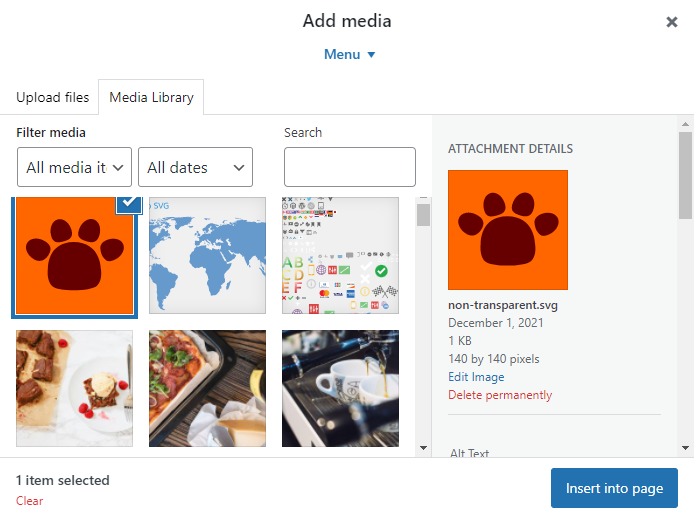
What this does is use an <img> tag to insert your external SVG, just like it would do for any PNG or JPEG.
<img src="https://example.com/wordpress/wp-content/uploads/2021/12/non-transparent.svg"
alt="" width="300" height="300" class="alignnone size-medium wp-image-240" >
Note that you can only use this for static images (or static animations) because <img> tags don’t support scripting, so any JavaScript present in the SVG code won’t be executed. This is good from a safety standpoint, but keep in mind that interactive SVGs are not supported.
Sanitization is only meant for static SVGs as the tools mentioned above will strip out any code that makes your SVGs interactive.
If you still want to use interactive SVGs (i.e., you want to execute JavaScript code), you can directly use <object>, <iframe>, or <svg> tags, but make sure your SVG has no malicious or bad code.
Read this external resource for more information on different ways of inserting SVGs on your page.
Summary
SVG files are a great choice to display logos, icons, and infographics on your site, both in terms of design and performance. However, WordPress doesn’t natively support SVGs as the nature of the file format makes them susceptible to external cyber attacks in some cases.
We’ve outlined some methods in this guide, showing you how to safely use them on WordPress. If you’re interested in using SVGs on your WordPress site, give this guide a try. Here are some external resources on safely using SVGs in WordPress:
- How to Safely Enable SVG Support in WordPress (Manually & Via Plugin)
- How to Add SVG to WordPress: Your Guide to Vector Images in WordPress
Test with different countries, speeds and options
Get access to more Test Locations, Analysis Options and Connection Speeds!
Sign up for a Basic GTmetrix account and see how your site performs in more scenarios – It’s FREE!