We show you how to use Imagify – a WordPress plugin designed to make image optimization effortless.
Affiliate Notice: You may find affiliate links to such products below – If you decide to purchase them through the links provided, we may be paid a commission at no extra cost to you. We only recommend products we’ve tested extensively and find genuinely impactful to your page performance and maintenance.
Key Takeaways
- Optimizing images improves page speed, SEO, and user experience by reducing file size and load times with minimal visual quality loss.
- Use the WordPress plugin Imagify to automate image compression, resizing, and next-gen format conversion (WebP/AVIF) for improved website performance.
- Next-gen formats like WebP and AVIF deliver smaller, faster-loading images while retaining visual quality.
- Additional best practices for image optimization include:
- Don’t upload images at max resolution – reduce file sizes with lossy or lossless compression
- Resize images before uploading to avoid browser resizing.
- Use JPEG for photos, PNG for transparent images, SVG for logos.
- Benchmark before/after results with GTmetrix testing, and monitor ongoing performance.
Overview
Images are ubiquitous on the internet, with over 99% of websites using at least one image, according to the HTTP Archive.
They are often the heaviest media/file type on the page, making them a key target for improving your website’s performance.
For WordPress users, image optimization doesn’t have to be technical or time-consuming due to the availability of many plugins that compress, resize, and serve your images in new gen formats to reduce file size and improve page load times.
![]()
In this guide, we will show you how to use Imagify to easily optimize your images without needing developer assistance.
Why Does Image Optimization Matter?
In a nutshell, optimized images are lighter and consume less bandwidth so they load faster and improve your visitors’ page experience.
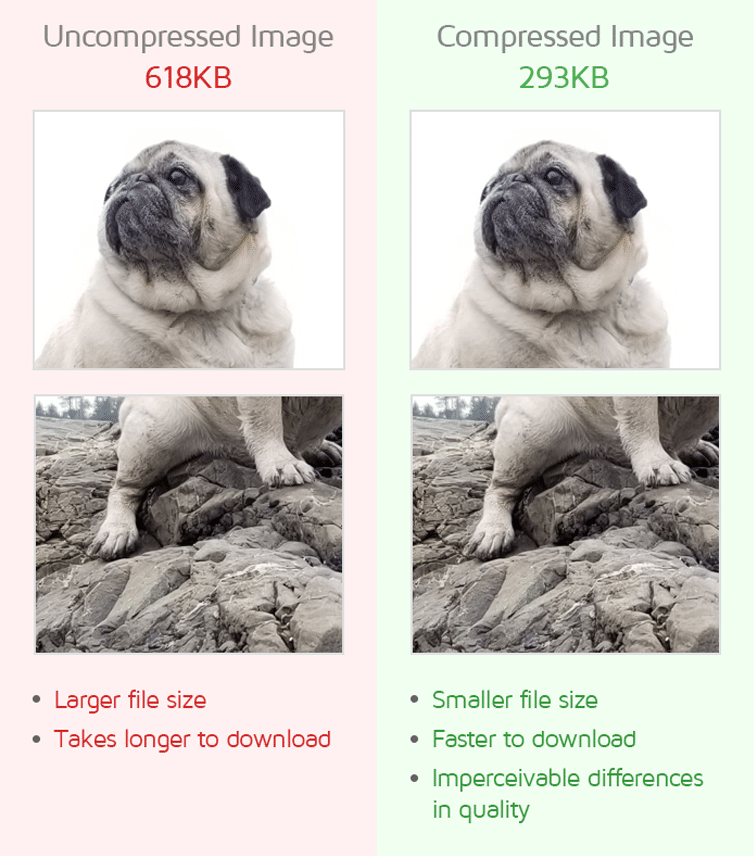
Image optimization basically boils down to:
- Choosing the right format for your images::
- Choose JPEG for photos, PNG for transparent graphics, SVG for logos or icons.
- Where possible, use new gen formats like AVIF, WebP for most images.
- Properly sizing your images:
- Export your images at the right quality (typically around 70-80%) and size them appropriately for the target audience to avoid forcing the browser to resize them.
- Efficiently encoding your images:
- Compress your images (without noticeably degrading image quality) to reduce your image file sizes and loading times.
Think about the type of images you typically see/use on websites these days. They may be:
- High resolution photos taken on DSLRs
- High quality logos or infographics
- Animated GIFs
- AI-generated cartoons
Unoptimized images are a major contributor to page bloat – increasing load times, and straining both server resources and user bandwidth. This can ultimately lead to higher bounce rates, lower conversion rates, and frustrate users.
Optimizing your images can have the opposite effect, leading to higher traffic, better engagement/conversions, and increased visibility on Google search, all of which means more revenue, making it an easy win for you.
What Does Imagify Do?
Imagify is an image optimization WordPress plugin that is also offered as an online service. It does the following:
- Automatically compresses images on upload to reduce file sizes for faster page loads. Two compression modes are offered:
- Smart compression: Balances optimal file size reduction with image quality (automatically enabled by default).
- Lossless compression: Reduces file size without any visible quality loss.
- Automatically converts uploaded images to new-gen image formats like WebP and AVIF, which can speed up loading times.
- Performs bulk optimization of existing images in the WordPress media library, and works in the background — no manual effort needed.
- Automatically resizes images to a specified maximum width during optimization to maintain optimal display across devices.
- Stores original images so that you can restore if needed.
In summary, Imagify applies all the major image optimization best-practices with just a few clicks.
This includes the aforementioned image optimization techniques and with an easy-to-use interface, the plugin is accessible to users without technical expertise.
How to Get Started With Imagify
Before getting started with Imagify, we’d suggest testing your page with GTmetrix first to establish baseline performance. This will also make it easier (and useful) to compare your page’s results before and after optimization.
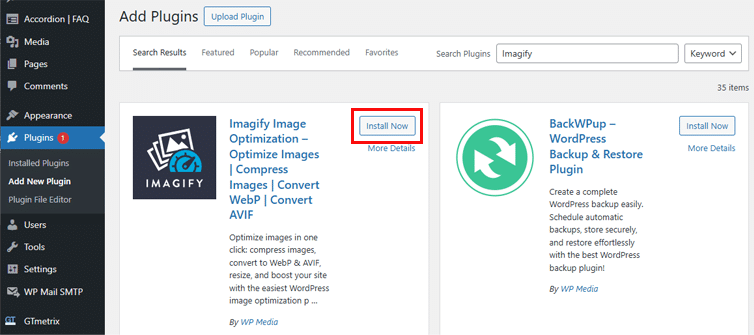
1) Install and Activate the free Imagify plugin directly from your WordPress admin
The procedure to do this is the same as any other plugin. Search for Imagify in the “Add New Plugin” menu and click on Install Now.
Once you’ve installed the plugin, click on Activate and you should then see “Imagify” in your plugins menu.
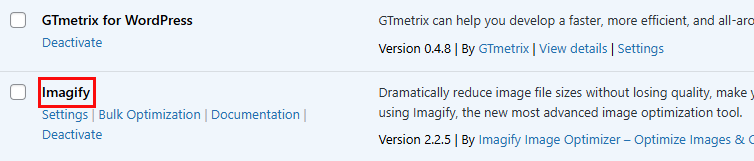
Now, click on “Settings”.
2) Create an account to get your API key
You can sign up directly from the plugin settings by clicking on Create a Free API Key.
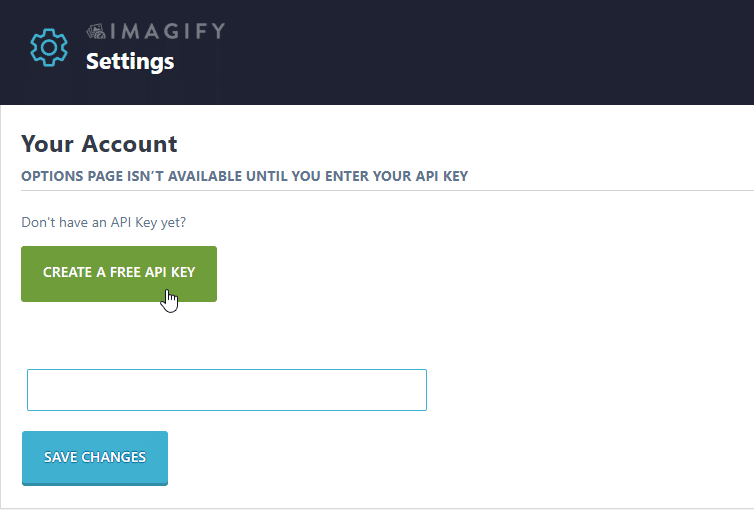
Free plans come with 20 MB of image optimization per month, which is fine for small websites.
Premium plans are available if you have higher usage needs.
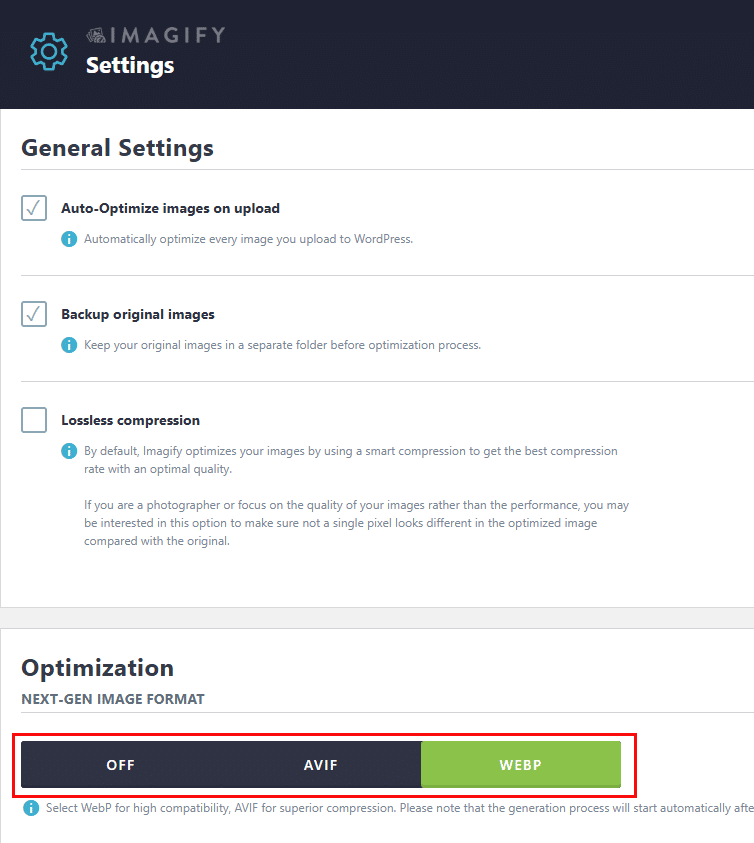
3) Configure the plugin settings as follows
- Enable Auto-Optimize images on upload
- Enable Backup original images are enabled
- Leave Lossless compression disabled by default
- This will ensure the plugin uses the Smart compression option to find an optimal balance of file size and image quality.
- If you absolutely need to have very high quality images, then you can enable this option but note that performance will degrade.
- Select either WebP or AVIF format for your images
- WebP offers near universal compatibility while AVIF often produces superior compression.
- Read our guide on using the right image formats to learn more on which format may be more suitable for you.
Once you’re done configuring all the settings, click on Save & Go to Bulk Optimizer.
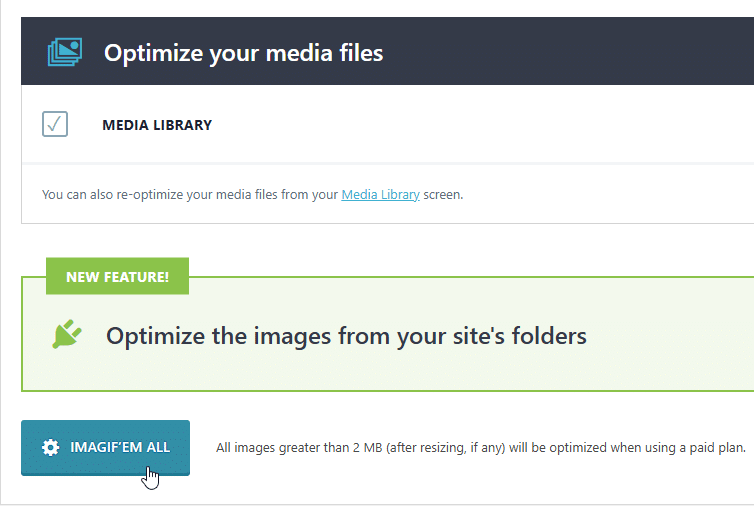
4) Bulk Optimize your Library images
Click on Imagif’em all to compress your images.
You don’t need to keep the page open as Imagify async bulk optimization process works in the background.
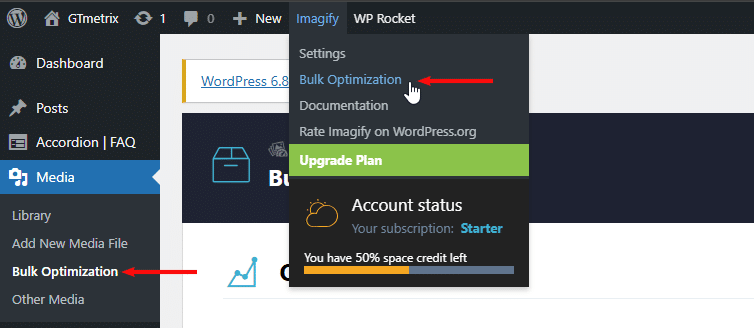
You can always return to the Bulk Optimizer Dashboard by hovering over Imagify in the Admin Bar (at the top of your admin page) and clicking on Bulk Optimization.
Alternatively, you can click on Bulk Optimization under the Media menu.
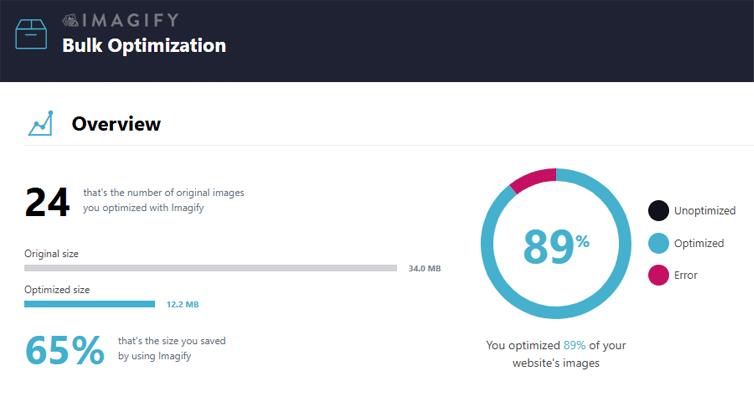
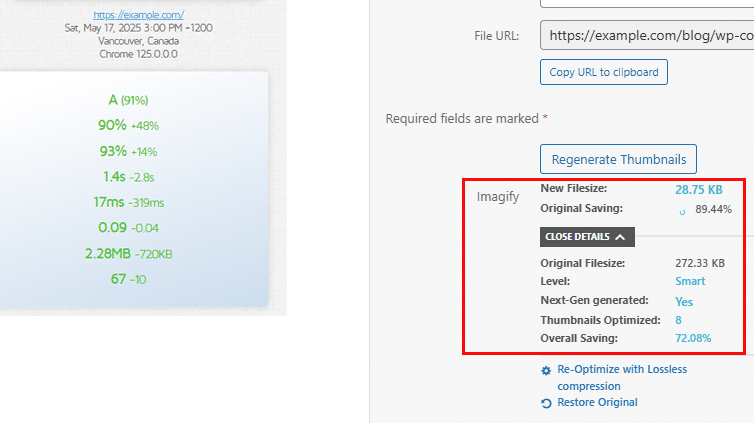
Once the bulk optimization is done, you can view the compression statistics highlighting the overall file size savings achieved by Imagify.
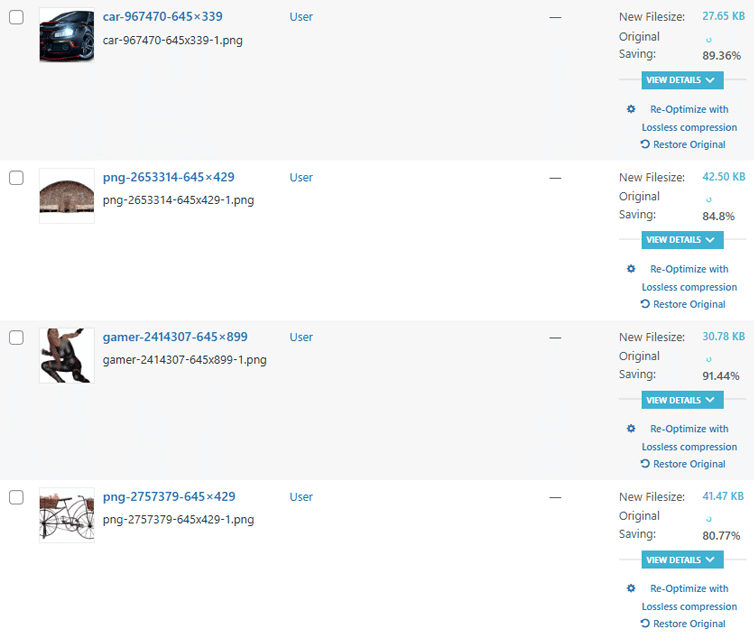
You can also visit your Media Library and see how much you have saved on each individual image.
Note that every new image you upload to the Media Library will automatically be optimized as per your configured settings.
Simple Tips for Better Results
While Imagify is a powerful plugin that can significantly reduce your image sizes and serve them in next-gen formats, we’d suggest following some image optimization best practices for even better results.
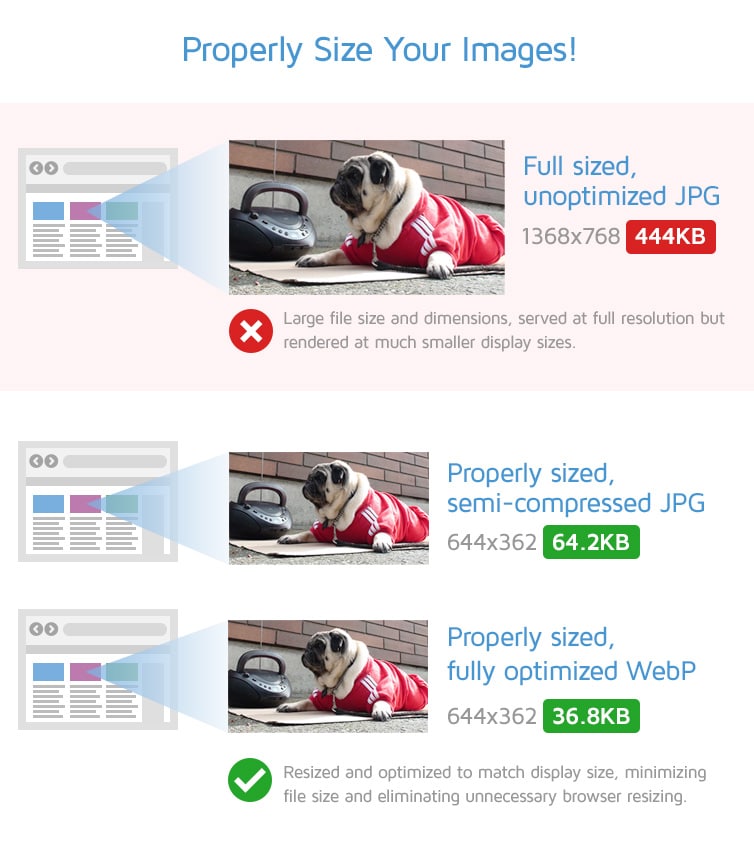
Properly Size Your Images
Even before you upload your images to your Media library, ensure that they are properly sized for your intended audience.
If you upload images that are too large, then your visitors’ browsers will always have to unnecessarily resize the image to fit their respective viewports.
While you can resize your images using Imagify, it is a good practice to incorporate this habit into your design and image creation workflow anyway.
Read our guide on properly sizing your images here.
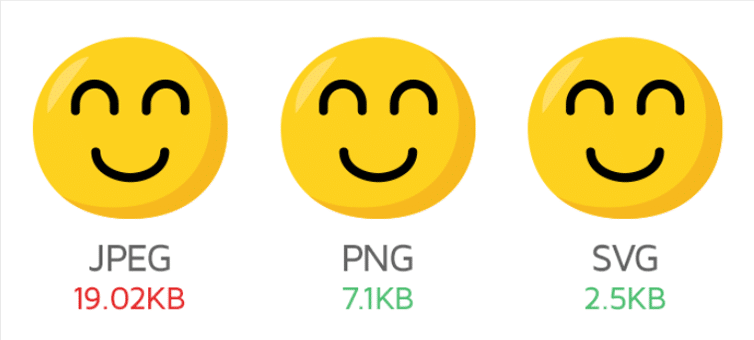
Use the Right Format
Keep in mind that once Imagify is activated (and you’ve configured it appropriately), Imagify will serve your images in the chosen next-gen format.
Before you upload the images to your library however, we’d suggest picking the right formats to start with so that you not only have a light image, but one well-suited for the use-case i.e.,
- JPEGs for photos
- PNGs for graphics/screenshots/mixed images
- SVGs for logos/vector graphics
Read our guide on choosing the appropriate image format here.
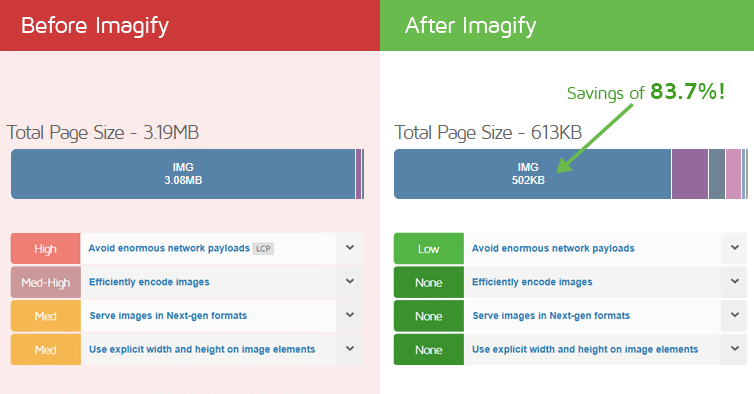
Test and Monitor Your Page With GTmetrix
Use GTmetrix to check the performance of your page before and after you use Imagify to see how much your page performance improves.
We’d also highly recommend monitoring your page after you’ve optimized it to keep an eye on your page performance.
This is especially useful for future updates to your website as adding/removing/modifying your images as needed can affect your page’s performance.
Final Thoughts
Images are often the heaviest media/file type on the page, and optimizing them is one of the easiest yet rewarding tasks you can do to improve your site’s performance.
Imagify makes image optimization effortless, and improves your site speed, SEO, and page experience for your visitors.
Use this guide to give Imagify a try – it’s free to use, and you only need to upgrade if you need more credits.
Optimize WordPress Images with Imagify
![]()
Compress and optimize all your WordPress images using Imagify.
Resize, compress, and even convert images to WebP or AVIF with just a few clicks.