
Last Updated:
Are you looking to maximize performance for your WordPress site? Here’s a step-by-step guide on using WP Rocket to optimize your WordPress installation.
Affiliate Notice: We only recommend products we’ve tested extensively and find genuinely impactful to your page performance. You may find affiliate links to such products below – If you decide to purchase them through the links provided, we may be paid a commission at no extra cost to you.
Overview
WordPress is by far the most popular Content Management System (CMS) as it’s easy to create a full-featured website with a lot of functionality thanks to a myriad of available themes and plugins.
We’ve written a generic WordPress Optimization Guide that walks you through how to improve WordPress website performance using a number of different plugins.
As we mentioned in that guide, if you’re looking for a more serious solution to your WordPress performance woes, one of the most popular premium plugins is WP Rocket.
![]()
The GTmetrix team has tested WP Rocket extensively and found it to be one of the most effective and simplest page performance plugins to improve WordPress loading speeds.
In this article, we’ll talk specifically about what WP Rocket does, and how to make the best use of it to optimize your WordPress site.
Note: This guide mainly addresses front-end optimization issues only
If your site still suffers from performance issues after following this guide, better hosting or back-end code optimization is what will likely make a real difference. Read our hosting for WordPress websites article for more details.
How WP Rocket Improves Site Performance
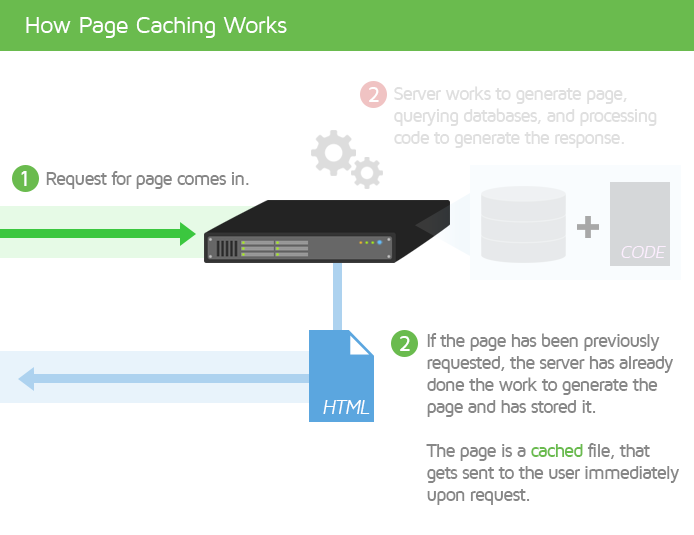
WP Rocket is a performance plugin that applies 80% of web performance best practices out of the box, including caching!
At a high-level, caching simply means making a copy of your HTML and static files (CSS/JS/images, etc.) so that your server doesn’t have to spend time generating your page every time someone visits your site.
WP Rocket focuses on page caching. The other assets are already static and don’t need cache generated for them – the plugin optimizes them when there is an opportunity and makes sure they have a long lifespan on the browser’s cache.
In addition to caching your site and its contents, WP Rocket can also help with common web performance best practices (e.g., compressing text resources, deferring JavaScript, delaying JS execution, CSS/JS minification, removing unused CSS, setting long browser cache TTL, etc.)
More Reasons we Like WP Rocket
- Simple to Use
- The user experience of WP Rocket is miles above other caching plugins offered, with an intuitive and easy to understand UI.
- Most features are fully automated requiring little to no configuration at all for them to work.
- Extensive Documentation
- WP Rocket has an in-depth knowledge base on how to use it, as well as articles on performance best practices (like we do!)
- WP Rocket has an in-depth knowledge base on how to use it, as well as articles on performance best practices (like we do!)
- Rich Feature Set
- Aside from caching, you can do a lot with WP Rocket – like lazy loading, loading scripts asynchronously, and more.
- Aside from caching, you can do a lot with WP Rocket – like lazy loading, loading scripts asynchronously, and more.
- It Just Works
- Once you install WP Rocket, it starts caching immediately without any guess work. You can see instant results with a reduced TTFB out of the box.
- Once you install WP Rocket, it starts caching immediately without any guess work. You can see instant results with a reduced TTFB out of the box.
- Expert and Reliable Support
- WP Rocket offers a friendly and knowledgeable support that consistently helps you, anytime you have a technical issue or a question.
WP Rocket is compatible with 99% of hosting providers, WordPress themes, page builders, plugins, and CDNs, so it likely won’t break your site or any of its functionality.
That being said, it’s always a good idea to backup your WordPress installation and test your site after installing WP Rocket to ensure that page functionality isn’t broken or affected in any way. More on this below.
How to Optimize WordPress With WP Rocket
Follow the steps below to optimize your site with WP Rocket.
Step 1) Set a Performance Baseline With GTmetrix
Before undertaking any optimizations, test your page on GTmetrix.com to establish a performance benchmark.
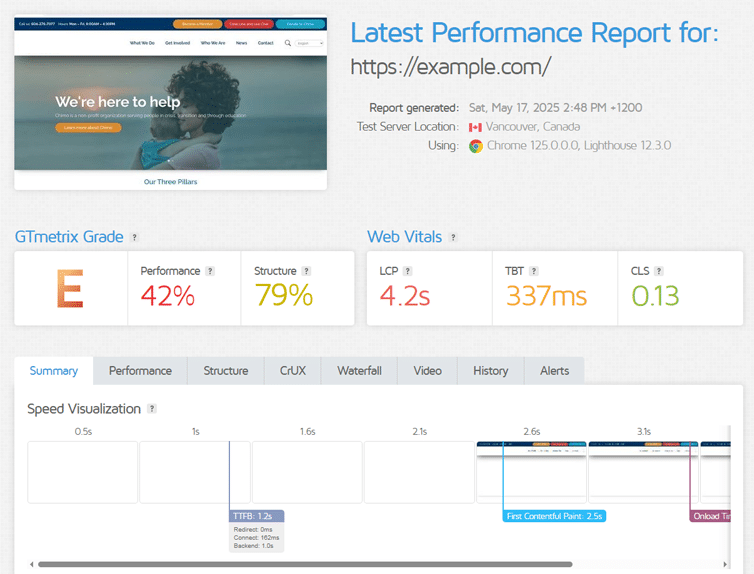
We recommend logging in (or creating a free account if you haven’t done so already) to analyze your site with GTmetrix as you’ll be able to keep better track of your website performance with Daily Monitoring and History Graphs.
It’s also worth re-analyzing your page on GTmetrix after each optimization step so that you can see which items are big wins, and which steps possibly make things worse.
Step 2) Backup Your WordPress Installation
It’s critical that you backup your WordPress installation before optimization and it’s generally a good practice to back up on a regular basis as well.
While you can use any of the available backup plugins offered on WordPress, we’ve previously covered how to use BackWPup to backup your entire WordPress install, including your database, plugins, themes, uploads, and more.
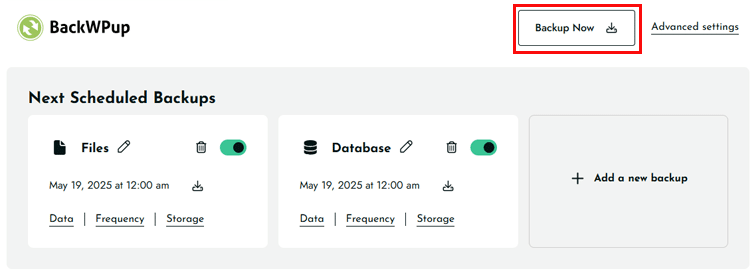
Full instructions available here.
Step 3) Remove any Unwanted or Unused Plugins
Before we even look at WP Rocket, it’s important to conduct a plugin cleanup.
It’s common to install many plugins over the course of your WordPress website lifetime, so review your plugin usage and remove the ones that aren’t needed anymore.
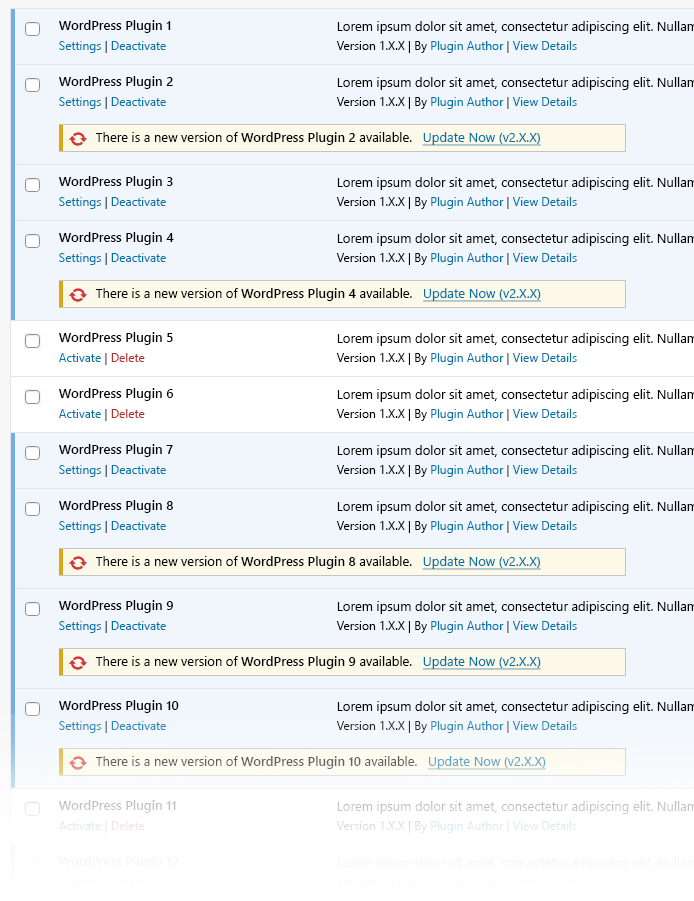
Make sure to delete unwanted plugins completely (and not just deactivate them) if you don’t need them anymore.
We also recommend updating all your plugins as they may contain performance enhancements and/or security fixes, among other improvements.
Step 4) Purchase and Install WP Rocket
WP Rocket is a premium plugin, so you must purchase a subscription (well worth the price in our opinion) before installing it on your WordPress website.
Visit the WP Rocket website, sign up for an account, and purchase your desired subscription plan.
Then, from your Account Dashboard, click on Download WP Rocket to download the plugin installation file.
On your WordPress sidebar, click on Plugins, and then click on “Add New Plugin”.
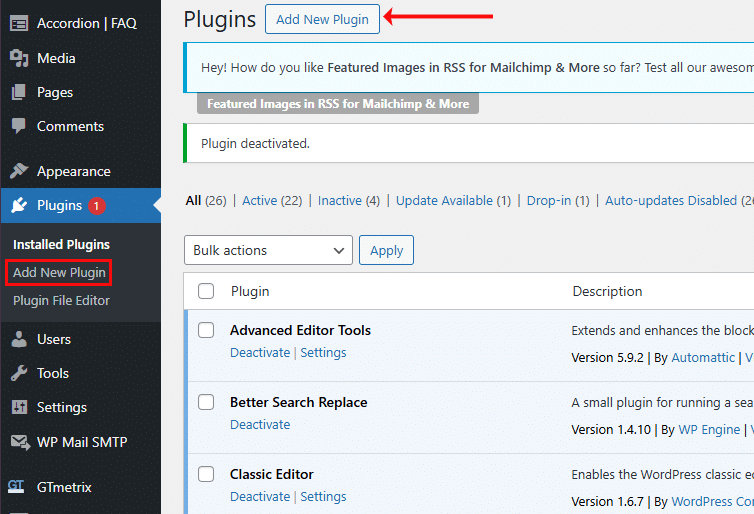
Upload the installation file that you downloaded from the WP Rocket website, and the plugin should be added to your WordPress install. Find WP Rocket on your list of plugins and activate the plugin by clicking on “Activate”.
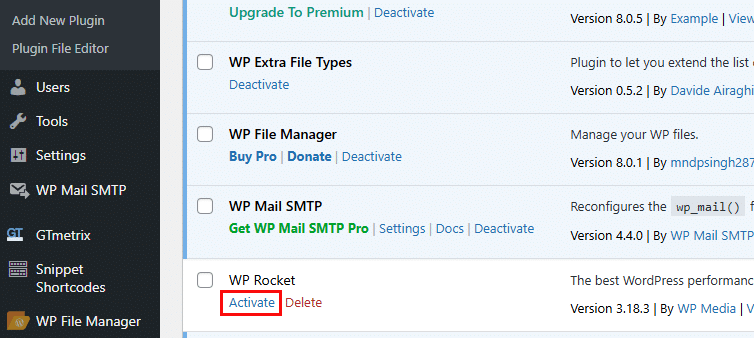
You’ve now successfully installed WP Rocket!
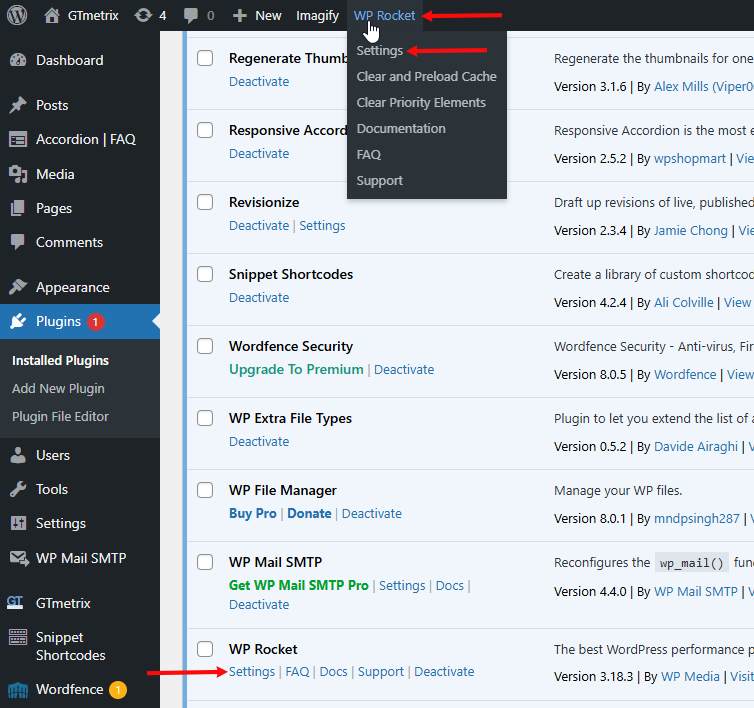
Step 5) Configure WP Rocket Settings
You can do this by either clicking on “Settings” under WP Rocket in the Plugins menu, or by simply clicking on WP Rocket in the Admin Bar (at the top of your admin page).
You should now see your Dashboard, showing your subscription information, and a host of other settings on the left.
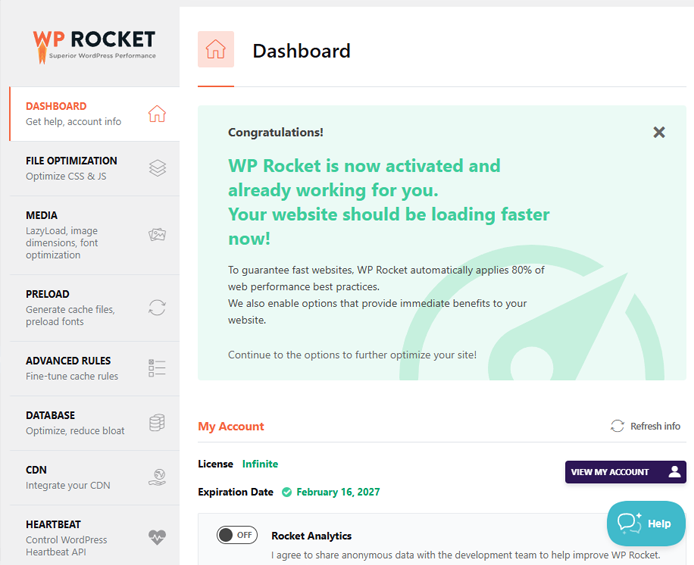
Right upon activation, WP Rocket will automatically enable several background features that don’t require any configuration, including:
- Page Cache, including Mobile Cache
- Optimize Critical Images
- Automatic Lazy Rendering
- Browser caching
- GZIP compression
- Preconnect to external domains (formerly Prefetch DNS Requests)
Also, the following features will be enabled by default:
- Minify CSS files and Minify JS files
- Cache Lifespan (set to 10 hours)
- Preload Cache
- Preload Links
- Heartbeat Control set to Reduce Activity
To further optimize your website performance, go through each of these sections and configure the following:
a) File Optimization
In this section, you can additionally optimize your CSS and JS files for improved performance.
Here are our recommended settings:
Enable Optimize CSS delivery and choose “Remove Unused CSS”:
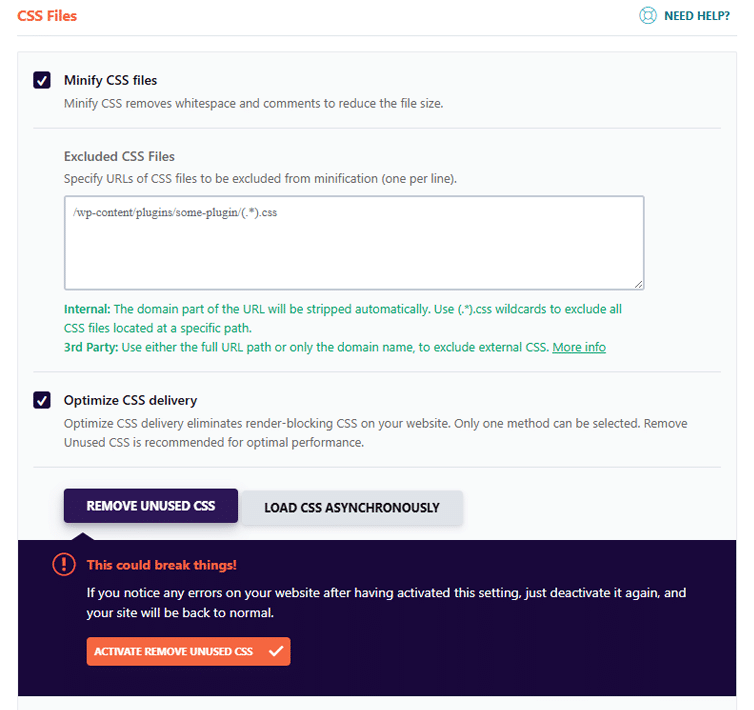
You’ll see a notice warning you that your site could potentially break due to this – click on “Activate Remove Unused CSS” to continue.
If you do run into any styling issues as a result of enabling this feature, refer to WP Rocket’s documentation on using Fallback critical CSS.
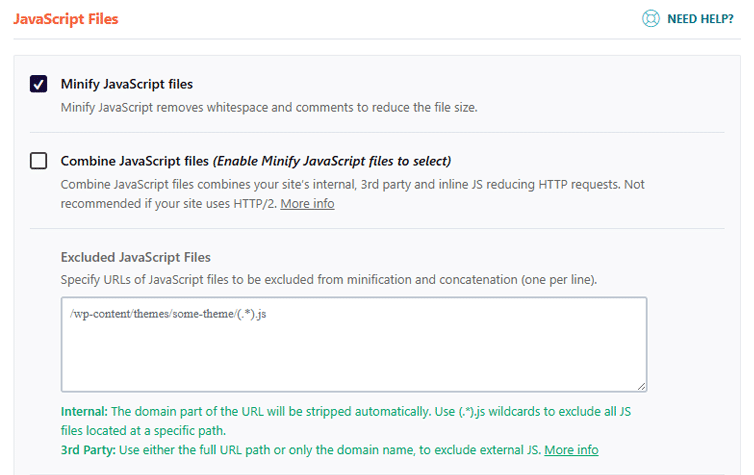
Under “JavaScript files“, you’ll find Minify JavaScript files is enabled by default for improved performance.
Leave the Combine JS files option unchecked, unless you are running on HTTP/1.1 (which you ideally shouldn’t be).
If needed, you can also exclude JS files from minification and concatenation by inputting the URLs in the provided box.
Scroll further down and enable the Load JavaScript deferred option.
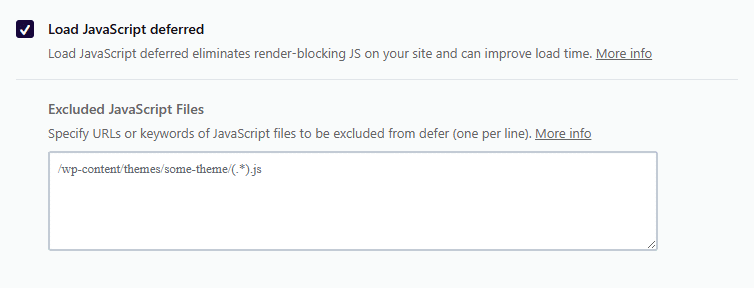
If any of these options break your site or affect site functionality you can exclude certain JavaScript files from being deferred.
Lastly, scroll down further and enable the Delay JavaScript execution feature, which delays the loading of JavaScript files until there is a user interaction such as touching the screen, scrolling, moving the mouse over the page.
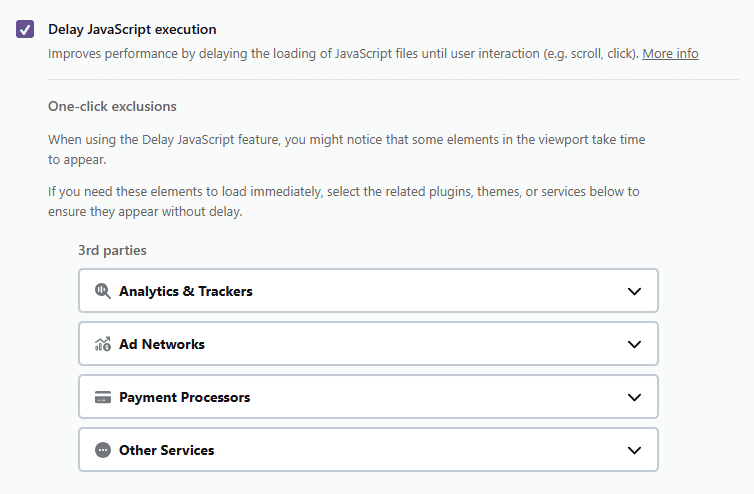
While the Delay JavaScript execution feature is a powerful JS optimization, you might notice that after enabling it, some elements take time to appear in the viewport – for instance, a slider or a 3rd-party analytics script.
If you need an element to load immediately, you can use the One-click Exclusions list (see above image) and select the relevant plugins, themes, or services that you want to appear without delay.
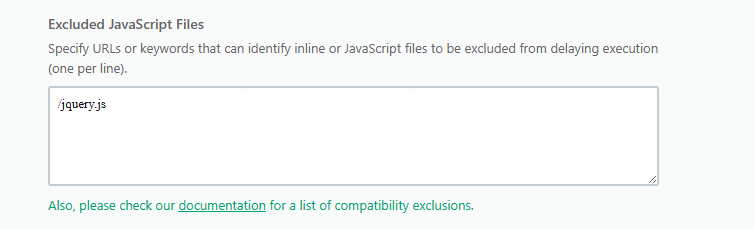
In addition to the one-click exclusions, you can specify other JavaScript files to exclude from being delayed by inputting their URLs in the provided box.
This feature also includes a checkbox marked Safe Mode for Delay JavaScript Execution – use this option to flag any issues you may face. Please note that this should only be a temporary solution to keep your site functioning.
In the meantime, we recommend contacting the WP Rocket support team to fix the problem.
In fact, in the long run, keeping it enabled could reduce your website’s potential performance improvements.

Click on Save Changes when you’re done.
b) Media
In this section, you can apply image and video optimization strategies to all your uploaded media content, and also Preload fonts and self-host Google fonts.

Ensure all the options in these sections are enabled:
- LazyLoad
- Enable for images
- Enable for CSS background images
- Enable for iframes and videos
- Replace YouTube iframe with preview image
- Replace YouTube iframe with preview image
- Image Dimensions
- Add missing image dimensions
- Add missing image dimensions
- Fonts
- Preload fonts
- Self-host Google Fonts
Click on Save Changes when you’re done.
Remember – You don’t need to exclude the LCP image from LazyLoad: WP Rocket does it automatically thanks to the Optimize critical images feature, which is enabled by default upon activation as a background feature.
c) Preload
In this section, you can define how WP Rocket preloads your cache, and other related options.
Under “Preload Cache”, enable Activate Preloading. WP Rocket will automatically preload your cache, so that it’s ready from the first visit.
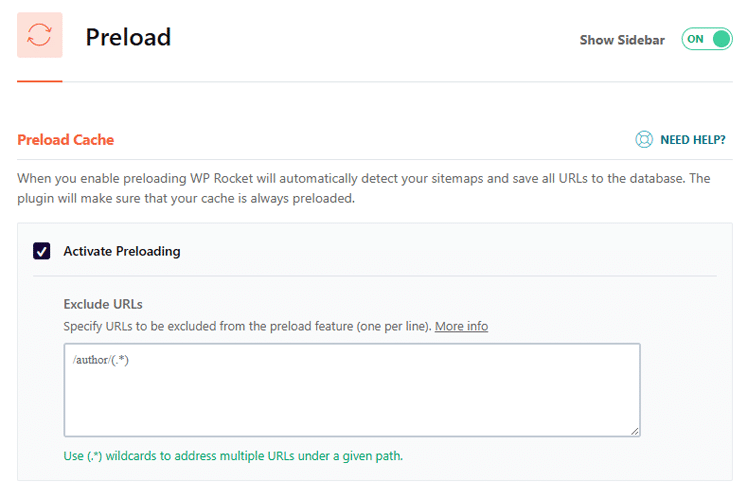
WP Rocket will preload your sitemap if it exists, or the homepage and all its links. Additionally, with the Mobile Cache option, the mobile version of the homepage will be preloaded as well.
When the sitemap is not discovered, Preload will do a first crawl of the homepage and all its links. It will also keep track of pages eligible to be cached outside of the initial list and will add them as they get discovered. You can also specify the URLs to be excluded from the preload feature.
Scroll further and under “Preload links”, ensure Enable link preloading is checked.
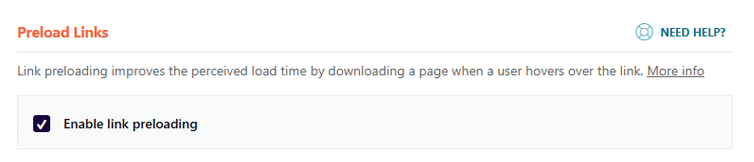
This ensures that the page for that link is downloaded by the browser earlier.
Click on Save Changes when you’re done.
d) Advanced Rules
This section is for more advanced options – mostly related to pages and scenarios you may want to exclude from caching. If you don’t need to exclude any page from caching, ignore this section and move on to the next set of options.
If you do need to exclude certain pages from caching, refer to WP Rocket’s documentation for more information on these advanced rules.
e) Database
This section allows you to clean up your database by removing revisions, drafts, transients, comments, and other types of backend overhead.
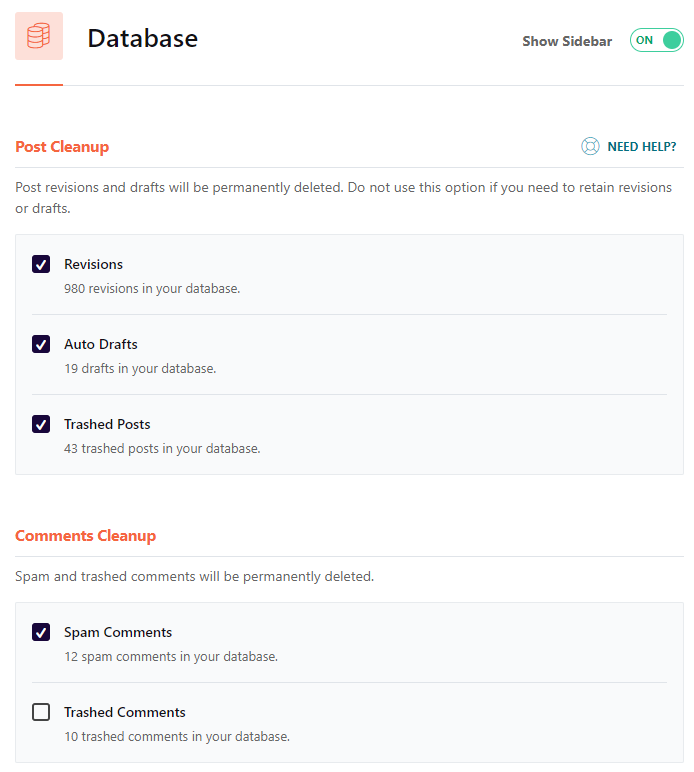
This step is not entirely required, especially if you need to retain some of these revisions/drafts or if they aren’t necessarily bloated.
If you do decide to cleanup your database, make sure you backup your WordPress installation so that you can recover it if something goes wrong.
Use your best judgement to determine if you want to proceed with this. Keep in mind that your site could be fast enough without this step but proceeding with database cleanup can provide a considerable boost in some cases.
Tick the desired boxes based on which parts of the database you want to clean up, and then click on Save Changes and Optimize.
That’s it for the main WP Rocket options!
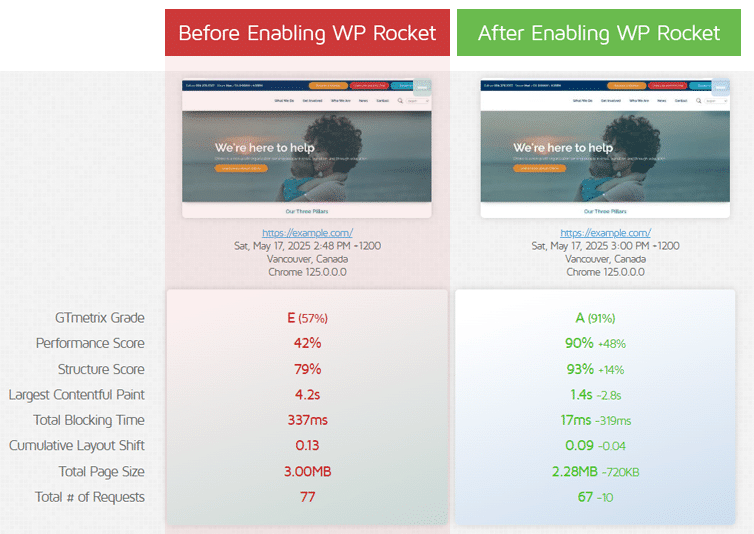
Step 6) Analyze Your Page Again
Once you’ve attempted all of the above, analyze your site again (via GTmetrix.com) and see the difference in performance!
You should see improvements in the following metrics:
- GTmetrix Grade
- Performance/Structure Scores
- Time to First Byte (TTFB)
- First Contentful Paint (FCP)
- Largest Contentful Paint (LCP)
- Speed Index (SI)
- Onload Time
You may also see some improvement in the Total Blocking Time (TBT) and Time to Interactive (TTI) metrics.
In general, you should see improvements in the following audits:
- Reduce initial server response time
- Eliminate render-blocking resources
- Serve static assets with an efficient cache policy
- Minify CSS/JavaScript
- Reduce unused CSS/JavaScript
- Reduce JavaScript execution time
- Minimize main-thread work
- Avoid chaining critical requests
- Avoid enormous network payloads
- Defer offscreen images
- Don’t Lazy load LCP image
Refer to our documentation to learn more on these metrics and audits.
Important Notes
The steps mentioned above are meant to be a general guide on optimizing your WordPress site with WP Rocket.
However, they do come with a few caveats and things to be concerned about.
We breakdown the most common and important ones below:
1) Test After Minifying and/or Combining Scripts
Minifying and/or combining scripts can break functionality on your website.
- Minification essentially goes through your scripts and removes extraneous data like comments, formatting, whitespace and other things that computers don’t need to read.
- Combining JavaScript files takes the contents of each individual file and aggregates them all into a single file.
Because these processes modify data, they may break functionality due to coding typos, syntax errors, duplicate function names, etc.
Make sure to check your site functionality after enabling the minification/combination features. If you find things are broken, disable all minification/combination features, and re-enable them one-by-one to find out which feature is causing the issue.
Note for combining stylesheets/scripts
CSS file combination is no longer offered on WP Rocket (from v3.15).
Combining JavaScript files is only recommended for HTTP/1.1 pages.
If your hosting environment supports HTTP/2, combination of files is likely not needed, as the HTTP/2 protocol has improved connection concurrency for requests.
However, if you have more than 100 JS requests, then your page may likely benefit from combination of files, even if you’re on HTTP/2.
We’ve written an article to help you decide whether you should combine your JS files.
2) Clear Your Page Cache After Making Site Changes
Whenever you make a manual change like editing a CSS file directly, it is recommended to clear your page cache to ensure you’re serving the latest version of the site.
Everything else is either automatically handled, or WP Rocket will prompt you with a message asking whether to clear your cache as it noticed an action that may or may not require it.
In WP Rocket, you can clear your cache in multiple ways:
From the Dashboard
On the WP Rocket Dashboard, click on the Clear and Preload button option under “Cache files” in the “Quick Actions” menu.
From the Admin Bar
On your WordPress Admin Bar at the top of the page, hover over WP Rocket to reveal a dropdown menu – click on Clear and Preload cache.
Purge cache for specific pages
If you only need to clear the cache on specific pages, you can do this in 2 ways:
From the Pages Menu
- On your WordPress sidebar, click on Pages.
- Hover over the required page, and click on Clear this cache.
You can also clear the cache from the specific WordPress post or page itself, by clicking on Clear Cache in the Publish box.
3) Additional options
There are other additional options available with WP Rocket (CDN, Heartbeat, Add-ons, Image Optimization). Heartbeat control is automatically activated, so the majority of users don’t need to do anything about this option.
Content Delivery Networks (CDN) can help your site load faster globally by storing and serving your static resources through server nodes all around the world.
While CDNs are an appropriate solution for most websites looking for speed improvements, not every site necessarily needs one. We’ve written an article on what CDNs are and whether you need to use one.
If you decide to use a CDN, you can integrate it with WP Rocket to prevent any potential incompatibilities that may arise due to conflicting settings.
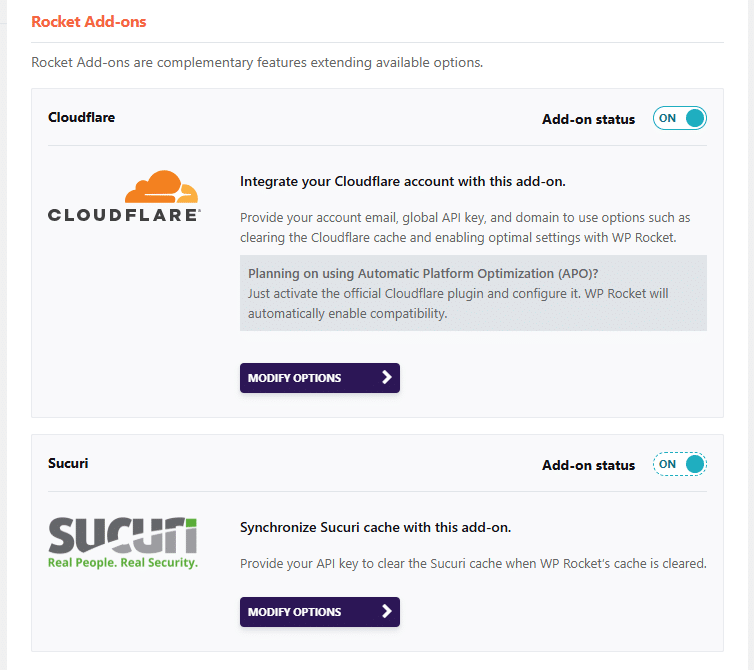
Cloudflare/Sucuri CDNs
If you specifically use Cloudflare or Sucuri, go to the “Add-Ons” settings and scroll down to “Rocket Add-ons”.
Toggle the respective Add-on status of your CDN to “ON” and then click on Modify Options. You can now enter your credentials to integrate them with WP Rocket.
Other CDNs
If you use a CDN from any other provider, you can integrate them by navigating to the “CDN” settings and enabling the Enable Content Delivery Network option. Add your CDN CNAMES and click on ADD CNAME.
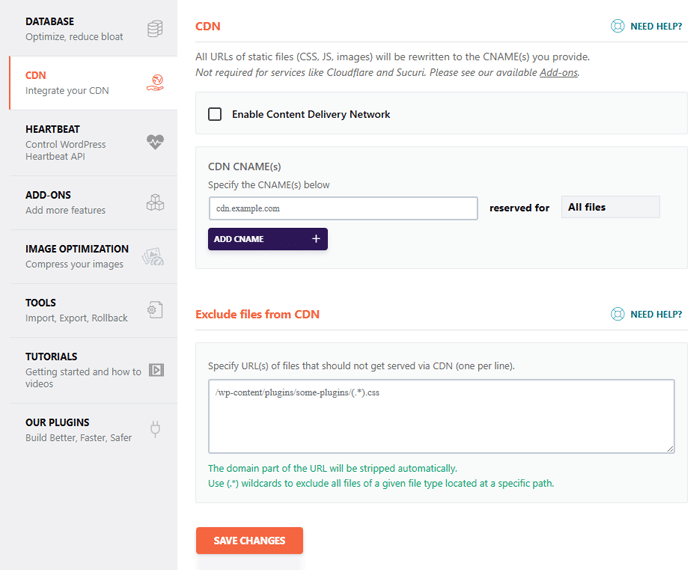
Learn more about configuring your CDN here.
You can also choose to go with RocketCDN – WP Rocket’s custom CDN. You can subscribe to the service directly from the CDN tab in WP Rocket.
Summary
WordPress is the most popular CMS and allows you to easily create a full-featured website. However, it’s important to optimize your site performance for a good user experience.
WP Rocket is a very good caching plugin that also applies some of the most common web performance best-practices to your site. This makes it a great overall fit for most websites, both in terms of compatibility and improving site performance.
If you have a WordPress site and are aiming to maximize your site performance for all your visitors, consider purchasing WP Rocket and giving this guide a try to make the best use of it.
Optimize WordPress Performance with WP Rocket
![]()
Optimize WP performance with just a few clicks using WP Rocket.
Get page caching, JS and CSS script optimizations, database cleanup and more!