
Last Updated:
Running WordPress? Here’s a step-by-step guide on optimizing your WordPress installation.
Affiliate notice: You may find affiliate links to recommended products below – If you decide to purchase them through the links provided, we may be paid a commission at no extra cost to you.
Overview
With a lot of great plugins and themes available, WordPress makes it easy to create a full-featured website with a lot of functionality.
However, it’s easy for your WordPress install to get bloated and unoptimized, hurting your site’s performance.
In this guide, we’ve listed some free and premium plugins and written some recommendations for our WordPress users seeking optimization help.
Note: This guide mainly addresses front-end optimization issues only
This guide can help to greatly reduce initial server/backend time, however if your site still suffers from performance issues after following this guide, better hosting or back-end code optimization is what will likely make a real difference. Read our hosting for WordPress websites article for more details.
Step 1) Test Your Page With GTmetrix
Before undertaking any optimizations, test your page on GTmetrix.com to establish a performance benchmark.
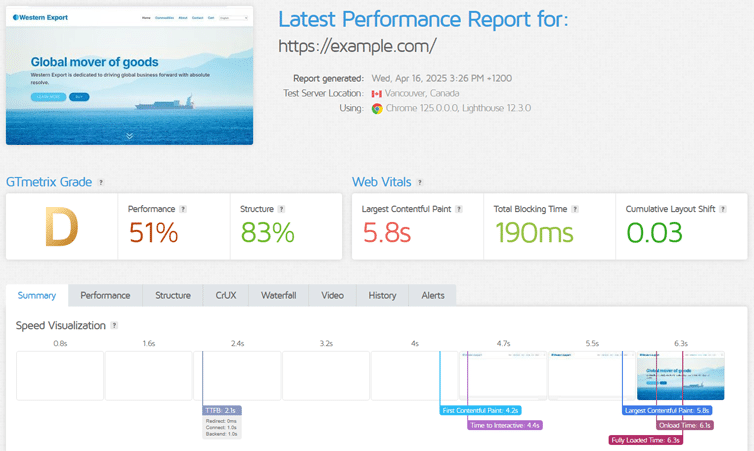
We recommend logging in (or creating a free account if you haven’t done so already) to analyze your site with GTmetrix as you’ll be able to keep better track of your website performance with Daily monitoring and History Graphs.
It’s also worth re-analyzing your page on GTmetrix after each optimization step so that you can see which items are big wins, and which steps possibly make things worse.
Step 2) Backup Your WordPress Installation
It’s critical that you backup your WordPress installation before optimization and it’s generally a good practice to back up on a regular basis as well.
You can use any of the available backup plugins offered on WordPress, but in this guide we’ll be showing you how to use BackWPup to backup your entire WordPress install, including your database, plugins, themes, uploads, and more.
Follow the instructions below to activate BackWPup and backup your WordPress installation:
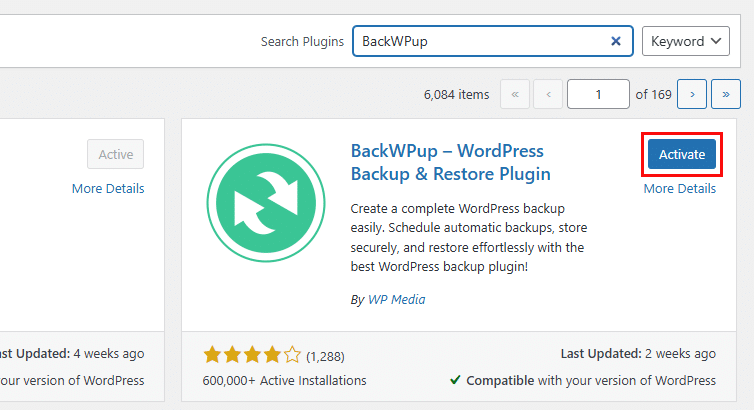
a) Install and Activate BackWPup
In the “Plugins” section of your WordPress install, click on Add New Plugin.
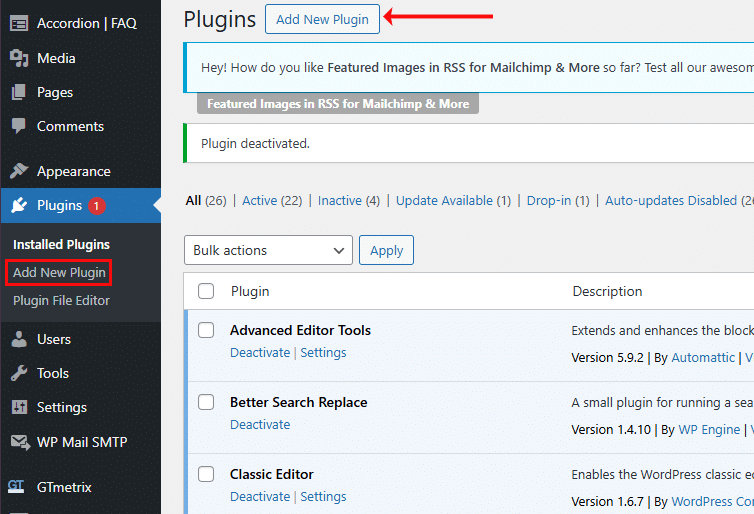
Search for BackWPup.Then install and activate the plugin.
b) Backup Your WordPress Installation
Now that BackWPup is installed and activated, you can proceed to start backing up your WordPress installation.
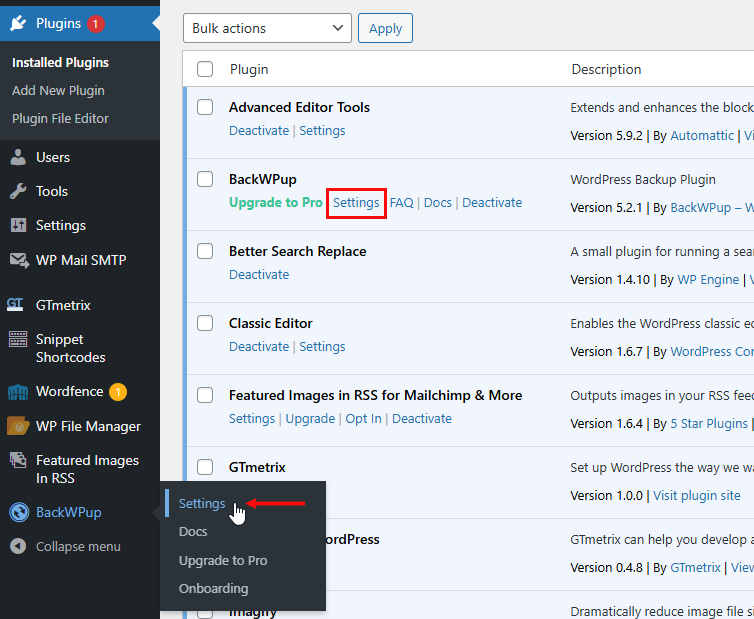
1) Open your BackWPup settings
From the Plugins menu, click on “Settings” under BackWPup to open the plugin settings. You can also do this from the sidebar by hovering over BackWPup.
2) Configure your backup settings
You’ll need to select what files to backup, how often to backup, and where to store your backup.
a) What files to backup
For this setting, leave both “Files” and “Database” enabled by default.
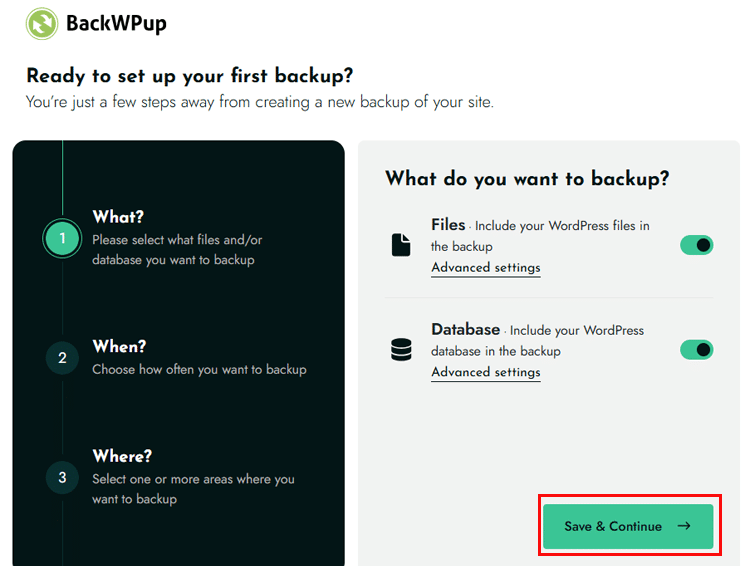
Use the “Advanced Settings” options if needed to exclude any files from the backup, but we’d suggest ignoring this for now.
Click on Save & Continue to proceed to the next setting.
b) When to backup
Next, you need to select your backup frequency – this would depend on the type of website and how often it gets updated:
- E-commerce/retail websites
- Daily backups are ideal.
- For frequently updating/mission critical websites, you may even select Hourly.
- Personal/less critical sites (e.g., Your cat blog)
- Weekly or even monthly backups may suffice.
Use the dropdown to select your frequency for both website and database.
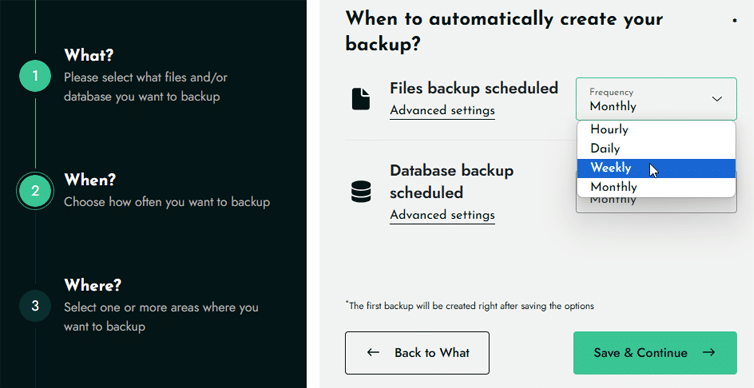
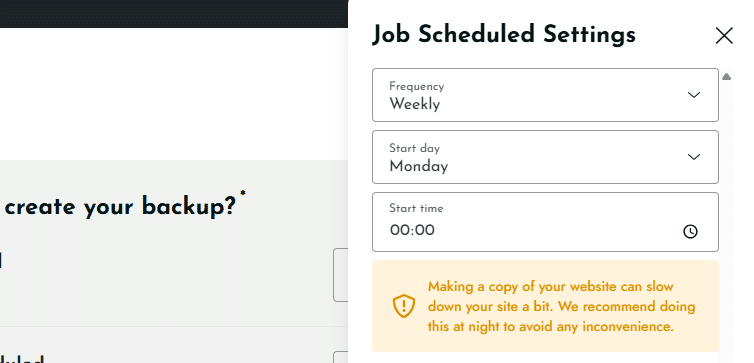
Click on “Advanced Settings” to select a suitable time for your scheduled backups.
Click on Save & Continue when you’re done with your selections.
c) Where to backup
Finally, you’ll need to select where to store your backup.
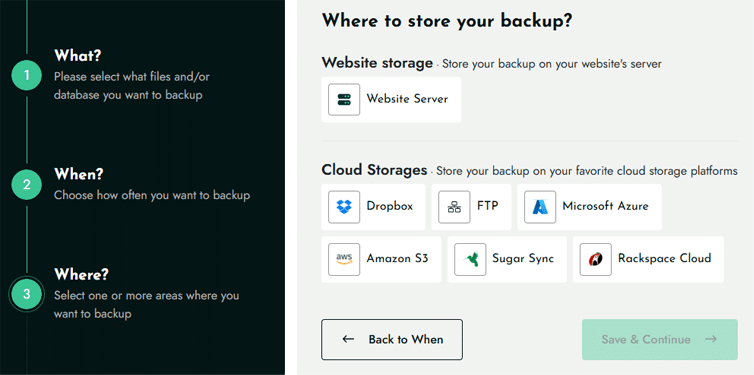
You can choose between your own website server or a number of external services, such as Dropbox, Amazon S3, Microsoft Azure, FTP, and more.
If you wish to store the backup on your website server, click on Website Server.
A menu will pop out, asking you to choose the relevant folder to store this backup. You can leave the “Max backups to retain” setting at 15, unless you are low on space.

Click on Save & Test connection.
To ensure there isn’t a single point of failure, you can also store your backup on any of the external cloud storage services.
Once you’ve made your selections, click on Save & Continue.
And that’s it! You should now see a message that BackWPup is creating a complete backup of your WordPress installation.
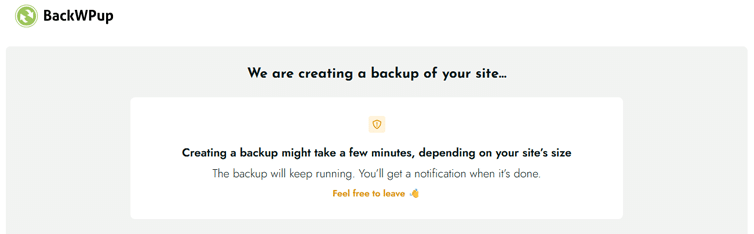
You can leave this page if needed as your backup will be running in the background and your backup schedule will also be set up.
If anything goes wrong with the optimization, or if your installation gets hacked or corrupted – you can restore it using your backups. More details here.
Always backup your site before any major update!
This is recommended so that you can easily restore it if something does break (e.g., plugins, themes, etc.).
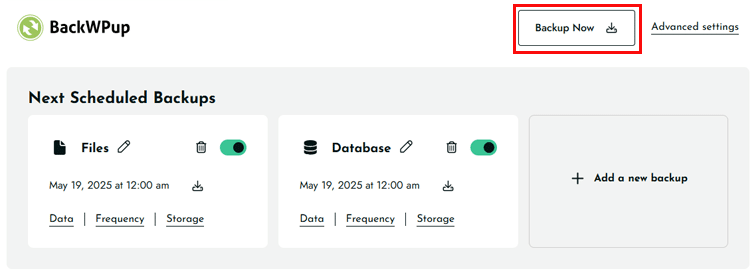
To perform a manual backup, open the plugin’s settings and click on Backup Now in the top right-hand corner.
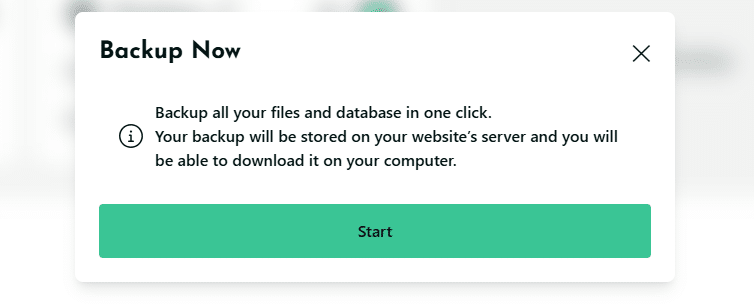
A popup will appear to confirm that all your WordPress files and database will be stored on your website’s server, and you will be able to download it later. Click on Start.
Step 3) Apply Performance Best Practices and Caching
The WordPress ecosystem provides some pretty powerful plugins to get you a faster WordPress website with just a few clicks.
Some of these plugins will focus on only caching your WP install, but others will apply various performance best practices out of the box, improving your audit and metric scores with little effort.
- Best Practices
- Automatically apply fixes to various audits (Avoid enormous network payloads via minification and GZIP compression, Preload key requests, etc.).
- Automatically apply fixes to various audits (Avoid enormous network payloads via minification and GZIP compression, Preload key requests, etc.).
- Caching
- Serve already generated data (i.e., cached content) to visitors, instead of dynamically generating data for every visit.
Applying both improves client-side loading of your page, and cuts down server/back-end time, improving Web Vitals, TTFB, and other performance metrics.
For Best Results
If you have a mission critical WordPress installation and are looking for a next-level performance solution, we recommend WP Rocket – a complete performance toolkit to apply key front-end optimizations, automatically improve various audits, and add powerful caching to reduce initial server time/TTFB.
Right out of the box, WP Rocket automatically applies 80% of web performance best practices, making your website load faster and improves many key performance metrics immediately.
Premium Performance with WP Rocket
Follow the instructions below to set up WP Rocket and automatically apply performance best practices and page caching functionality to your website:
a) Purchase and Install WP Rocket
WP Rocket is a premium plugin, so you must purchase a subscription (well worth the price in our opinion) before installing it on your WordPress website.Visit the WP Rocket website, sign up for an account, and purchase your desired subscription plan. Then, from your Account Dashboard, click on Download WP Rocket to download the plugin installation file.
On your WordPress sidebar, click on "Plugins", and then click on Add New Plugin.
Upload the installation file that you downloaded from the WP Rocket website, and the plugin should be added to your WordPress install.
Find WP Rocket on your list of plugins and activate the plugin by clicking on "Activate".
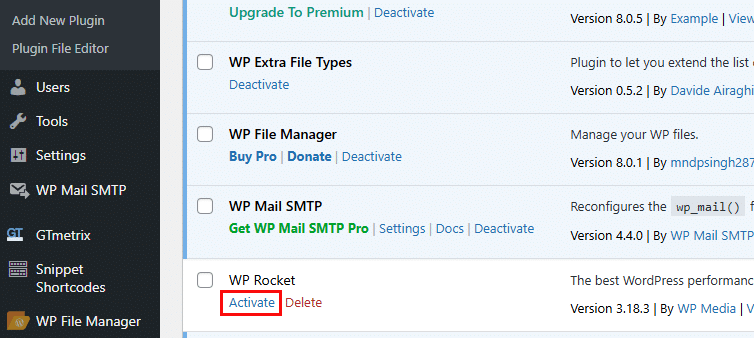
You've now successfully installed WP Rocket!
b) Configure WP Rocket Settings
You can do this by either clicking on "Settings" under WP Rocket in the Plugins menu, or by simply clicking on WP Rocket in the Admin Bar (at the top of your admin page).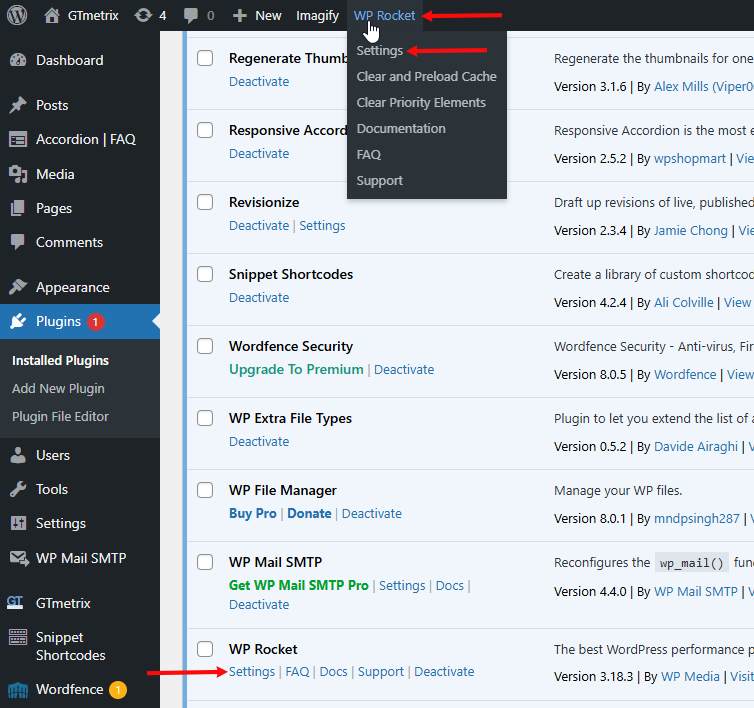
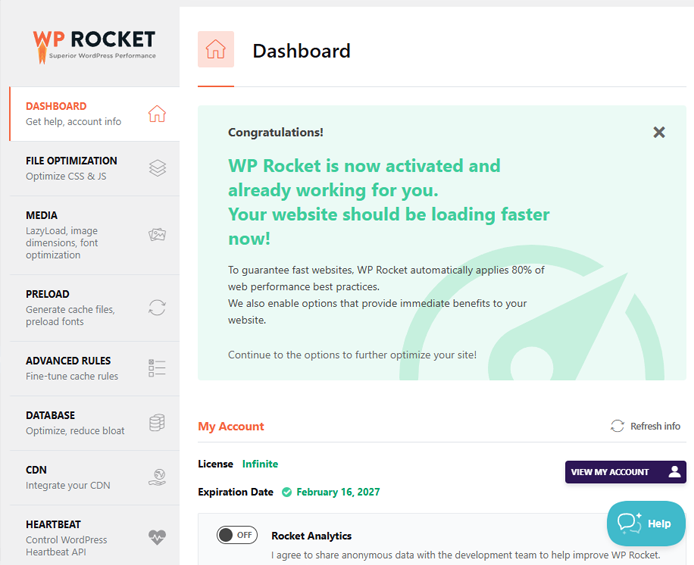
You should now see your Dashboard, showing your subscription information, and a host of other settings on the left.
For newer versions of WP Rocket (version 3.16 and newer), many of the best practices like caching for mobile devices, CSS/JS minification, excluding above-the-fold images from lazy loading, etc. are automatically applied to your site.
Now, go through each of these sections and configure the following:
- a) File Optimization
- Ensure Minify CSS files is checked (should be automatically checked on versions 3.18 and newer).
- Enable Optimize CSS delivery - leave it defaulted to "Remove Unused CSS". You should see a tick next to Activate Remove Unused CSS.
- Note that this feature may break your site. If you find this to be the case, you can click on the Activate Remove Unused CSS button again and specify any CSS files you wish to exempt from CSS removal.
- Alternatively, you can switch to the "Load CSS Asynchronously" option.
- Ensure Minify JS files is checked (should be automatically checked on versions 3.18 and newer).
- Leave Combine JS files unchecked, unless you are running on HTTP/1.1.
- Enable Load JavaScript deferred.
- b) Media
- LazyLoad
- Ensure Enable for images is checked.
- Ensure Enable for CSS background images is checked.
- Ensure Enable for iframes and videos is checked.
- Image Dimensions
- Ensure Add missing image dimensions is checked.
- LazyLoad
- c) Preload
- Enable Activate Preloading.
- Ensure Enable link preloading is checked.
- d) Advanced Rules
- Keep "Cache Lifespan" defaulted to 10 hours - lower this number if you update your page often.
- If you need to exclude certain login/logout pages from your website cache, use the field provided under the "Never Cache URLs" section to do this.
- e) Database
- Clean up your database by removing revisions, drafts, transients, comments, and other types of backend overhead.
- Make sure you backup your WordPress installation before doing this in case something goes wrong.
- Tick the desired boxes based on which parts of the database you want to clean up, and then click on Save Changes and Optimize.
- f) Add-Ons
- Enable the "User cache" to enable caching for logged-in WordPress users.
- If your server uses Varnish caching, enable the "Varnish" add-on to synchronize your Varnish and WP Rocket caches.
For a more detailed rundown on the WP Rocket settings, please visit our full WordPress Optimization Using WP Rocket guide here.
For older versions of WP Rocket (older than 3.16)
If you are using WP Rocket versions older than version 3.16, you may need to manually enable the below settings that are automatically applied in newer versions.- a) Cache
- Ensure Enable caching for mobile devices is checked.
- Ensure Enable caching for logged-in WordPress users is checked.
- Keep Cache Lifespan defaulted to 10 hours - lower this number if you update your page often.
- b) Media
- Don't lazy load the LCP image!
- In older versions, Critical Image Optimization is not automatically applied so you will have to manually exclude LCP images by specifying their URL in the "Excluded images or iframes" field.
- Ensure Replace YouTube iframe with preview image is checked.
- Don't lazy load the LCP image!
For Small WordPress Websites (Free)
There are many free caching plugins available for WordPress, but results may be limited in terms of performance improvement. If you’re looking for a basic but free caching solution, click below.
Basic Caching with a Free Plugin
Follow the instructions below to set up WP Fastest Cache and add page caching functionality to your website:
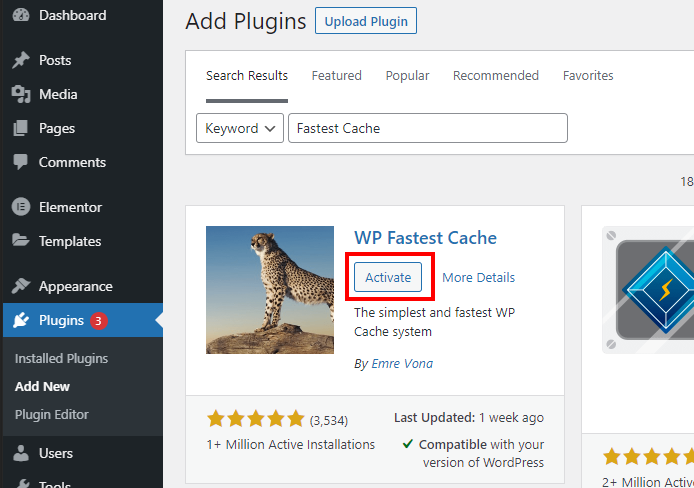
a) Download, Install, and Activate WP Fastest Cache
Download, install, and activate WP Fastest Cache, in the same way you installed the other plugins.
b) Set Up WP Fastest Cache
Once WP Fastest Cache is installed and activated, you can now set it up to cache your WordPress install.
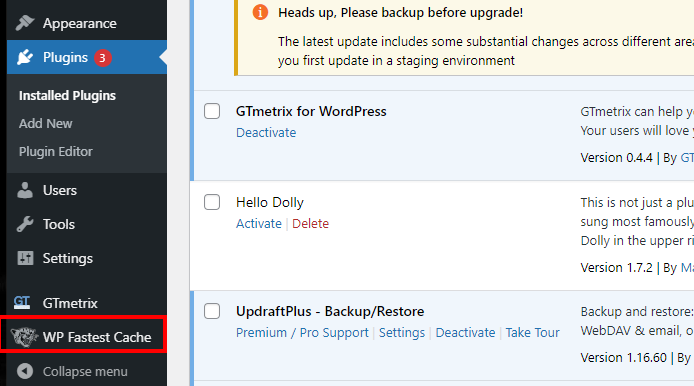
1) Open WP Fastest Cache Settings
On the sidebar, you'll notice a new option called "WP Fastest Cache". Click on this option to open the plugin settings.
2) Enable the following settings
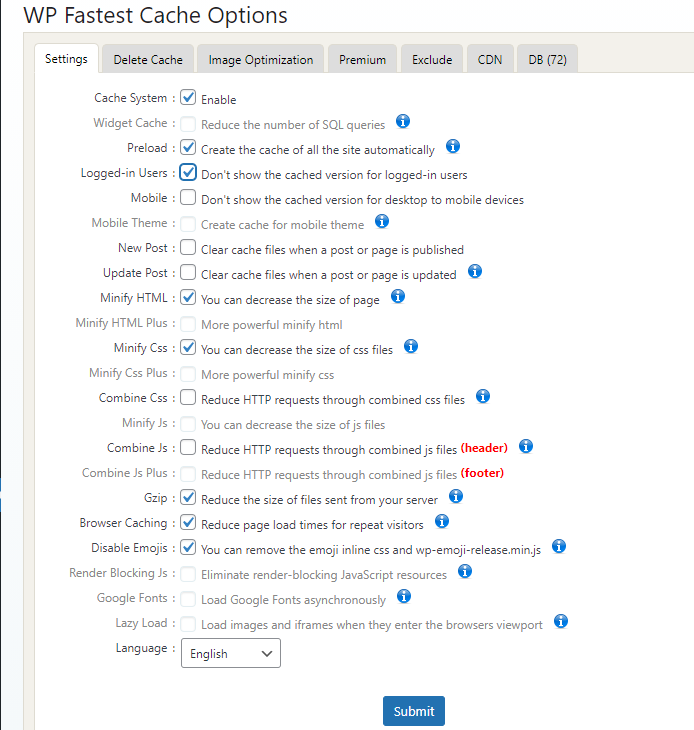
- Cache System.
- Enable - This activates caching functionality.
- Enable - This activates caching functionality.
- Preload
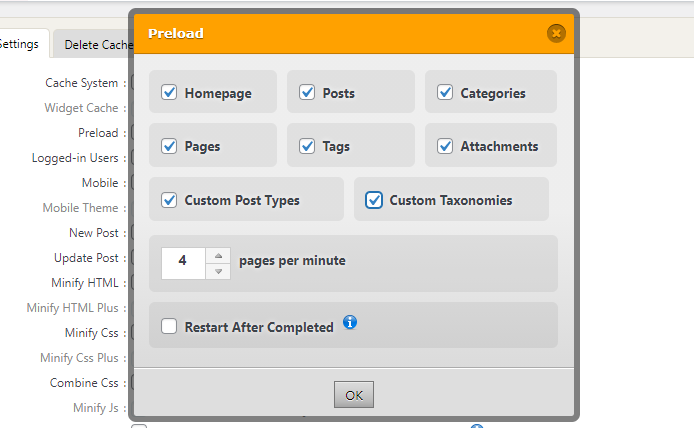
- Enable - This tells the plugin to preload your pages. Upon enabling, you'll get a popup asking you which pages to cache.
- Check all the categories - Particularly Home
page, Posts, Categories, Pages.
- Check all the categories - Particularly Home
page, Posts, Categories, Pages.
- Leave the "pages per minute" at 4.
- You may need to reduce this number depending on your hosting provider limits.
- You may need to reduce this number depending on your hosting provider limits.
- Leave the "Restart After Completed" option unchecked.
- Read more on why in the plugin documentation.
- Read more on why in the plugin documentation.
- Click "OK".
- Enable - This tells the plugin to preload your pages. Upon enabling, you'll get a popup asking you which pages to cache.
- Logged-in Users
- Enable - Ensures that if you're logged in, you see the actual state of your pages, not the cached versions.
- Enable - Ensures that if you're logged in, you see the actual state of your pages, not the cached versions.
- Minify HTML*
- Enable - Compresses your page's HTML and reduces file size.
- Enable - Compresses your page's HTML and reduces file size.
- Minify CSS*
- Enable - Compresses your page's CSS and reduces file size.
- Helps with the Minify CSS audit.
- Gzip
- Enable - Further compresses your pages to be smaller in file size and faster to download.
- Helps with the Enable text compression audit.
- Browser Caching
- Enable - Ensures repeat visits to your page are faster due to cached content.
- Helps with the Serve static assets with an efficient cache policy audit.
- Disable Emojis
- Prevents WordPress from automatically loading inline CSS and emoji scripts.
- Most webpages don't need this feature, so you can tick this option.
- Leave this option unchecked if you want to load emojis in your header. More on this option.
Click Submit when you're done.
Minifying and combining scripts may break site functionality in some cases
Minification and combination of HTML/CSS/JS may impact functionality of your website and should be tested thoroughly to ensure no errors on the website are present after enabling.
This is the reason why we generally don’t recommend minification or combination of JavaScript files, as it is a main culprit for site breakage. More on this below.
Step 4) Optimize Images
Image optimization is an important, and in many cases, high-impact task in your WordPress optimization workflow, helping with the Efficiently encode images audit and reducing your overall total page size.
There are many plugin options for WordPress image optimization.
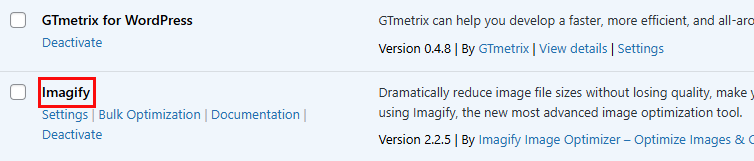
We’ll focus on the Imagify plugin to optimize every image uploaded in your Media Library (and every image uploaded going forward).
Follow the instructions below to optimize your images using Imagify:
1) Install the free Imagify plugin directly from your WordPress admin
The procedure to do this is the same as with the other plugins. Once you’ve activated the plugin, you should see “Imagify” in your plugins menu.
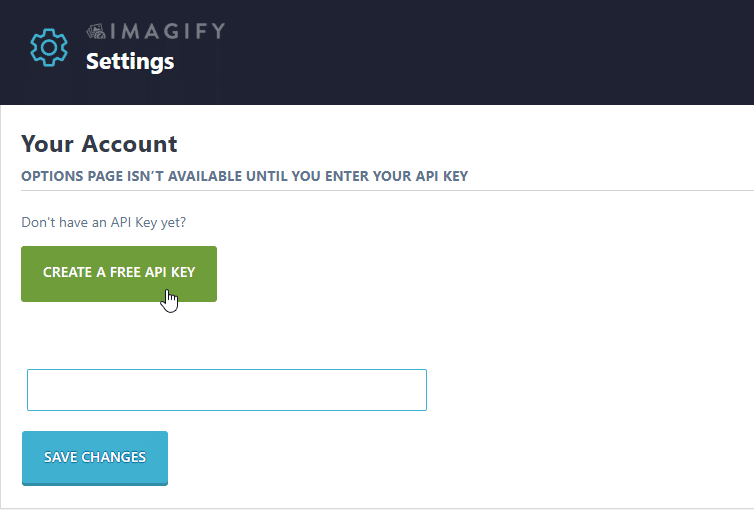
2) Create an account to get your API key
You can sign up directly from the plugin settings by clicking on Create a Free API Key.
Note that Imagify is free for upto 20 MB of data each month.
3) From the sidebar, go to Media -> Bulk Optimization and click on “Imagif’em all” to compress your images
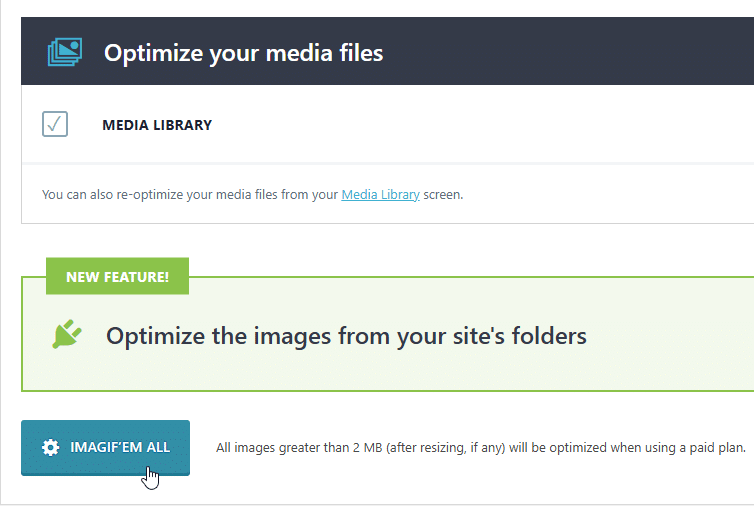
Note that you don’t have to choose any compression level because the plugin automatically applies the Smart (lossy) compression mode to balance performance and quality.
Moreover, you don’t need to keep the page open as Imagify async bulk optimization process works in the background.
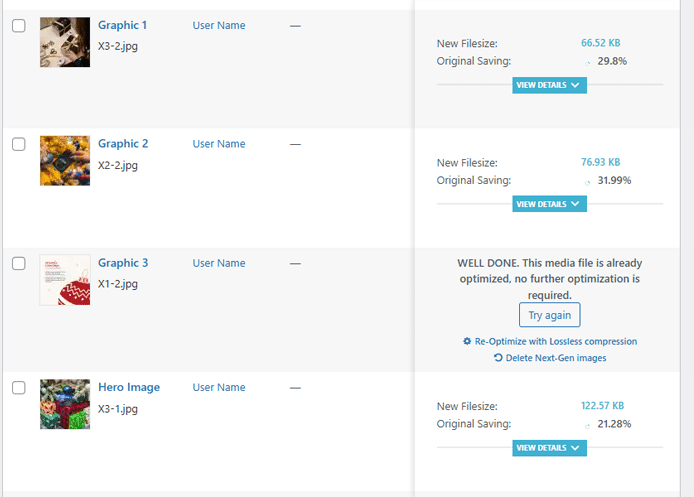
4) That’s it! Go to Media -> Library to see the compression statistics for each image
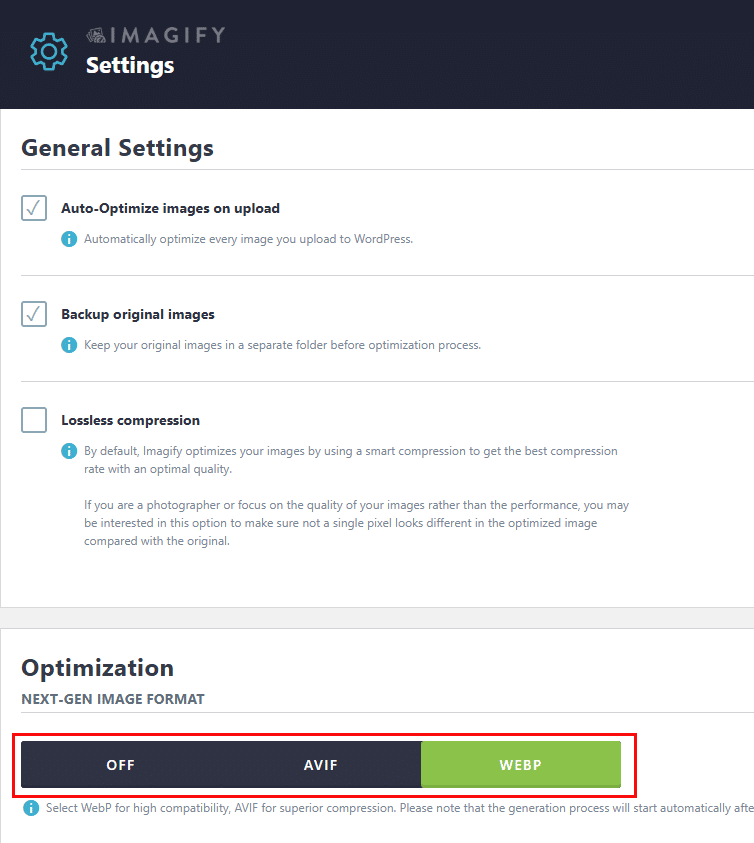
Imagify converts images to WebP by default, but you can go to the Settings page and change your preferences to the AVIF format too.
Step 5) Remove any Unwanted or Unused Plugins
It’s common to install many plugins over the course of your WordPress website usage. Some plugins provide critical features, others may have only been used for a short period, and truthfully – a few may be sticking around and you don’t even remember why! (It happens to the best of us).
That’s why it’s important to conduct a plugin audit – review your website’s plugin usage and remove the ones that aren’t needed or used anymore.
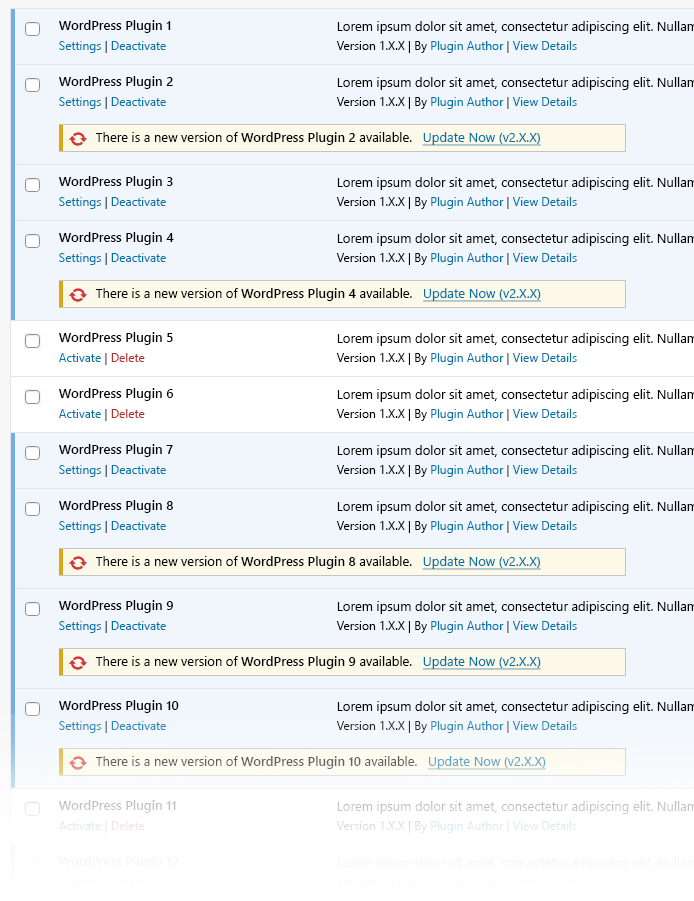
Deactivating plugins reduces your page requests and total page size, and is often one of the best ways to improve your WordPress site’s performance.
You should note though in some cases, simply deactivating your plugin isn’t enough. Even though a deactivated plugin doesn’t load requests anymore, it may still result in a bloated database and can introduce security risks.
Hence, the recommended practice is to delete unwanted plugins completely if you don’t need them anymore.
We also recommend updating all your plugins as they may contain performance enhancements and/or security fixes, among other improvements.
Caution: Advanced optimization strategies ahead!
At this point, you should analyze your page again.
If caching and image optimization provides you with sufficient performance gains, you can stop here and proceed to Step 8.
If performance is still lacking, your page may benefit from certain advanced optimizations like removing unnecessary scripts from various page loads, or other back-end/server optimizations.
Note that you should proceed with caution as these steps could potentially break site functionality, so developer assistance is highly recommended.
Step 6) Selectively Load Scripts
As you add plugins to your WordPress install, scripts from the plugins get added to the global header of your page, meaning they’re loaded on every page.
So every time a visitor loads your page, all the plugin scripts get loaded too, whether they are actually needed on the specific page or not. The more plugins you have, the more scripts you have – which may impact your performance heavily.
An effective task you can perform to improve page performance is to only serve the scripts that are actually needed on the various pages of your website.
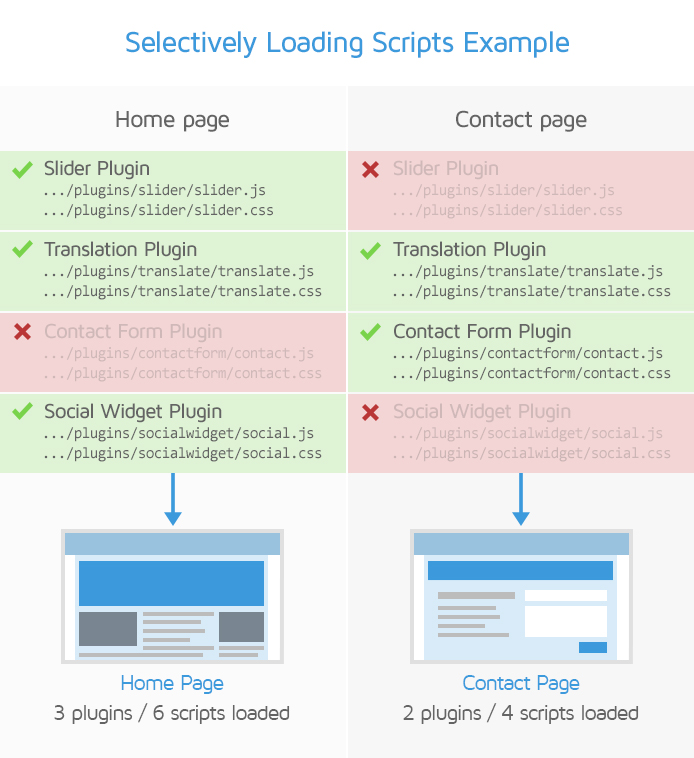
For example, if you use a plugin that generates contact forms, you can make it so that its CSS/JS files are only loaded on your Contact page.
Asset Cleanup is a plugin that lets you identify and remove unnecessary requests from specific pages so that it can load faster.
Follow the instructions below to remove unnecessary scripts from pages with Asset Cleanup:
1) Download, install, and activate Asset Cleanup
The procedure to do this is the same as with the other plugins. Once you’ve activated the plugin, you’ll have access to a new menu option called Asset Cleanup on your WordPress sidebar.

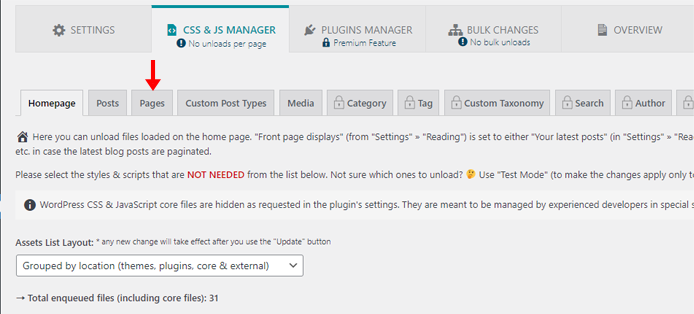
2) Open the CSS & JS Manager settings
You should see a list of CSS/JS requests from various plugins, themes, and other third-party services that are loading on your site.
Note that we’re starting with requests that load on your Home page, which is the default option (confirm this by making sure Home page is selected at the top of the settings).
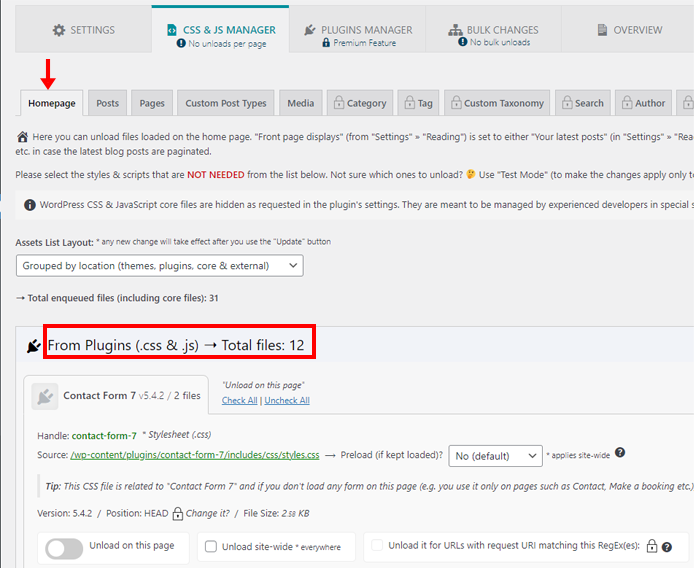
3) Identify and unload requests that are not needed on your Home page
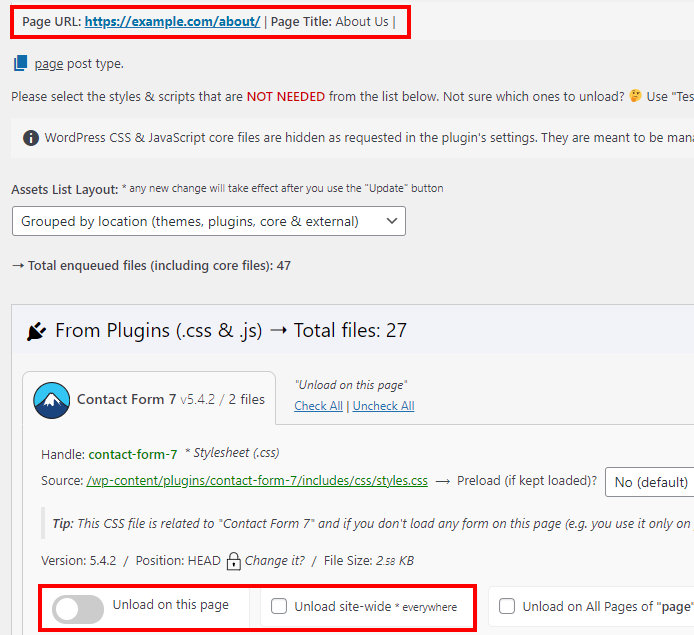
One way to identify if a particular file isn’t needed is to look at which plugin is requesting the file, and see what the name of the file is.

For example – in the above image, 2 files called
styles.css and index.js are being requested on the Home page by the Contact Form 7 plugin.
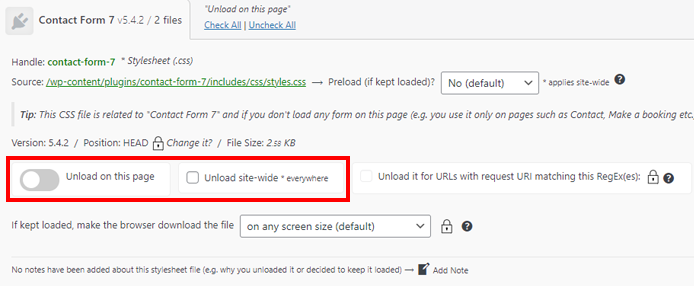
These files are necessarily to style and provide some functionality for a contact form, but if you don’t have a contact form on your Home page, it isn’t necessary to load these scripts on the Home page.
To remove a request from your Home page, click on Unload on this page. If you’d rather remove the request entirely from all pages on your website, click on Unload site-wide.
4) Test your Home Page
Clear your page cache and load your Home page in an incognito/private browser instance to test for proper layout and functionality – make sure that nothing is broken as a result of your script cleanup.
If you discover issues, revert the scripts you unloaded (one-by-one) to ensure you’re not unloading anything that the Home page needs to function or display properly.
5) Identify and unload requests that are not needed on other pages
Once you’ve completed the Home page, you can move onto the next pages.
At the top of the CSS & JS Manager settings, click on Pages.
Start typing keywords into the filter bar (e.g., About, Contact, etc.) and click on the page you wish to clean up.
You should now see a list of CSS/JS requests for that particular page. Identify and remove the requests that aren’t needed on this particular page.
Repeat this as needed for all your website’s pages – and remember to test, test ,test!
Step 7) Perform Server Optimizations
Web performance is a combination of back-end and front-end performance.
While most of the plugin related optimizations mentioned above are related to the front-end structure of your page, it’s important to ensure that things on your hosting side are also running efficiently.
We’ve previously written a guide on how lost-cost hosting doesn’t mix well with complex WordPress websites.
In addition to choosing more powerful hosting and optimizing your backend code, there are a few things you can do as a WordPress user to improve your site performance:
1) Preloading the Interpreter
By default, PHP loads and parses each application script whenever a request is made to the server.
Preloading the interpreter involves loading libraries and frameworks into the memory cache before any application code is run. In some cases, this can result in a significant improvement in server processing time.
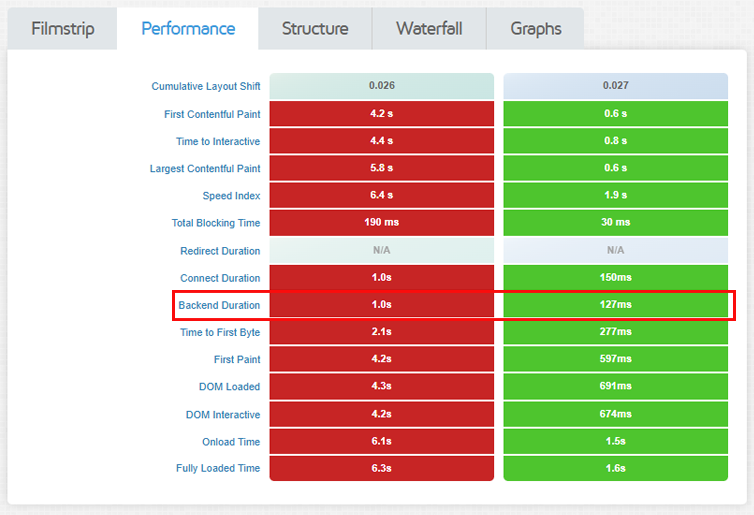
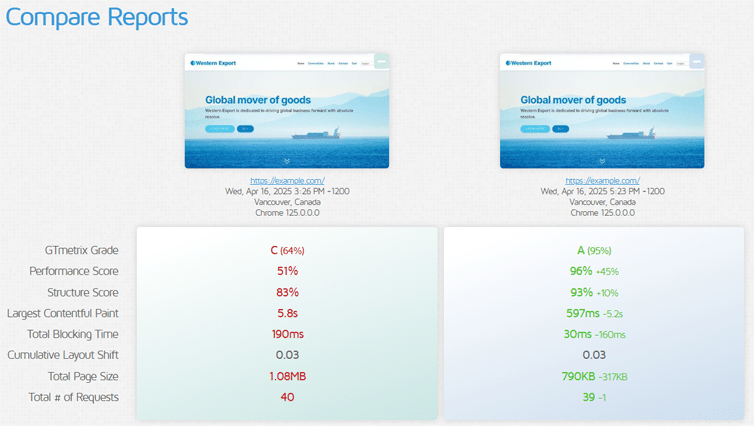
In the above example, preloading the PHP scripts resulted in an 87% improvement in Backend Duration, speeding up all other relevant page timings and resulting in a much faster page load.
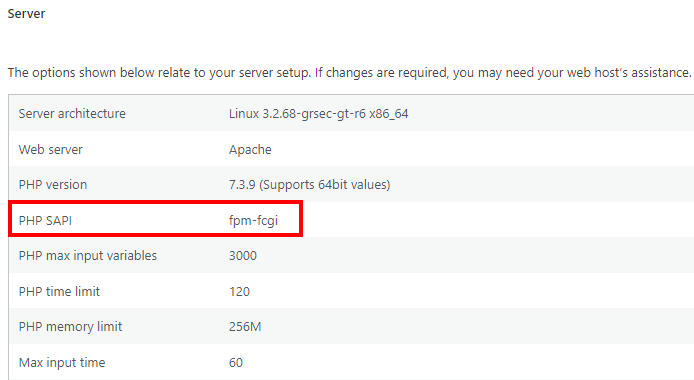
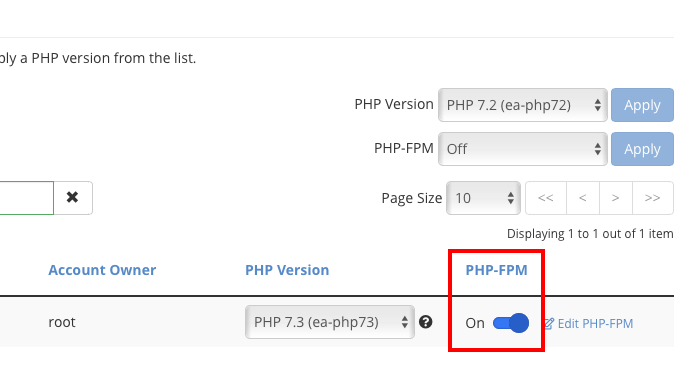
One way to preload PHP scripts is by using PHP-FPM (FastCGI Process Manager). In WordPress, you can check if your server interface already uses PHP-FPM by hovering over “Tools” on your WordPress sidebar and clicking on Site Health.
Now, click on Info and navigate to the “Server” sub-menu. If you’re using PHP-FPM, the PHP SAPI field should display fpm-fcgi.
How to enable PHP-FPM
PHP-FPM needs to be enabled on the server side. You can do this via your hosting admin panel (e.g., cPanel) or you may need to contact your hosting provider’s support team to help you enable it.
Note that PHP-FPM may not be available for all hosting services and/or packages. This is especially true for the lower cost hosting plans.
If you’re not sure how to enable PHP-FPM, or if your hosting service provides it, it’s best to reach out to your hosting provider support team to inquire.
Here are some external resources on PHP-FPM:
- PHP-FPM Cuts Web App Loading Times by 300%
- Optimizing PHP-FPM for High Performance
- Ready, Preload, Go
Note that preloading PHP scripts comes with a few caveats:
- Again, not all web hosts and plan-levels support preloading the interpreter (e.g., PHP-FPM).
- Preloading PHP scripts is not supported on Windows-based servers.
- PHP-FPM implementation differs depending on the type of web server used (e.g., Apache, NGINX, etc.).
Developer Assistance Highly Recommended
Preloading the interpreter is an advanced process that should only be attempted by experienced developers. You can safely ignore this recommendation if you’re not confident in your abilities, or reach out to your hosting provider’s support for further assistance.
2) Updating the PHP Version
It’s also important to ensure that you’re running the latest PHP version for your hosting configuration. Updating your PHP version can help you gain some performance and security benefits as well as access to new WordPress features.
To check your PHP version (you’ll need admin rights), hover over “Tools” on your WordPress sidebar, and click on “Site Health”.
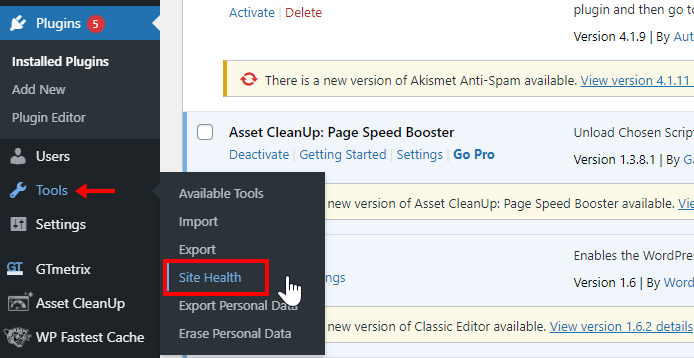
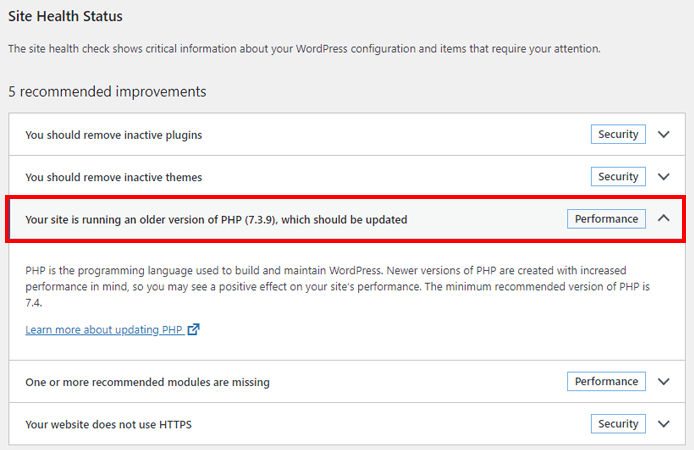
If you’re not running the latest PHP version, WordPress will flag it as one of the recommendations. Expand the recommendation, and follow the link to update your PHP version.
Step 8) Analyze Your Page Again
Once you’ve attempted all of the above, analyze your site again (via GTmetrix.com) and see the difference in performance!
You should see improvements in the following metrics:
- GTmetrix Grade
- Performance/Structure Scores
- First Contentful Paint
- Largest Contentful Paint
- Time to Interactive
- Speed Index
- Number of Requests
You should also see improvements in the following audits:
- Eliminate render-blocking resources
- Minify CSS/JavaScript
- Reduce unused CSS/JavaScript
- Efficiently encode images
- Enable text compression
- Serve static assets with an efficient cache policy
Refer to our documentation to learn more on these metrics and audits.
Your mileage may vary! Due to the varying nature of WordPress installations, plugin usage and hosting environments, you may not be able to considerably affect all of the above metrics. Things like third-party resources (Facebook widgets, YouTube embeds, etc.) and ads can still heavily affect your score.
Important Notes
The steps mentioned above are meant to be a general guide on optimizing your WordPress site.
However, they do come with a few caveats and things to be concerned about.
We breakdown the most common and important ones below:
1) Test After Minifiying and/or Combining Scripts
Minifying and/or combining scripts can break functionality on your website.
- Minification essentially goes through your scripts and removes extraneous data like comments, formatting, whitespace and other things that computers don’t need to read.
- Combining CSS/JavaScript files takes the contents of each individual file and aggregates them all into a single file.
Because these processes modify data, it may break functionality due to coding typos, syntax errors, duplicate function names, etc.
Make sure to check your site functionality after enabling the minification/combination features. If you find things are broken, disable all minification/combination features, and re-enable them one-by-one to find out which feature is causing the issue.
Note for combining stylesheets/scripts
CSS file combination is no longer offered on WP Rocket (from v3.15).
Combining JavaScript files is only recommended for HTTP/1.1 pages.
If your hosting environment supports HTTP/2, combination of files is likely not needed, as the HTTP/2 protocol has improved connection concurrency for requests.
However, if you have more than 100 JS requests, then your page may likely benefit from combination of files, even if you’re on HTTP/2.
2) Clear Your Page Cache After Making Site Changes
Whenever you make major changes to your site, like adding a plugin or modifying the CSS/theme, it is recommended to clear your page cache to ensure you’re serving the latest version of the site.
In WP Rocket, you can do this by going to Settings -> WP Rocket -> Dashboard tab and clicking on the Clear and Preload button under “Quick Actions”.
Another way is via the WordPress tool bar (or Admin bar). Hover over the WP Rocket menu link and you will see a dropdown menu. Click on the Clear and Preload Cache link.
3) Consider Using a Content Delivery Network (CDN)
Content Delivery Networks (CDN) can help your site load faster globally by storing and serving your static resources through server nodes all around the world.
While CDNs are an appropriate solution for most websites looking for speed improvements, not every site necessarily needs one. We’ve written an article on what CDNs are and whether you need to use one.
If you decide to use a CDN, you can integrate it with WP Rocket to prevent any potential incompatibilities that may arise due to conflicting settings.
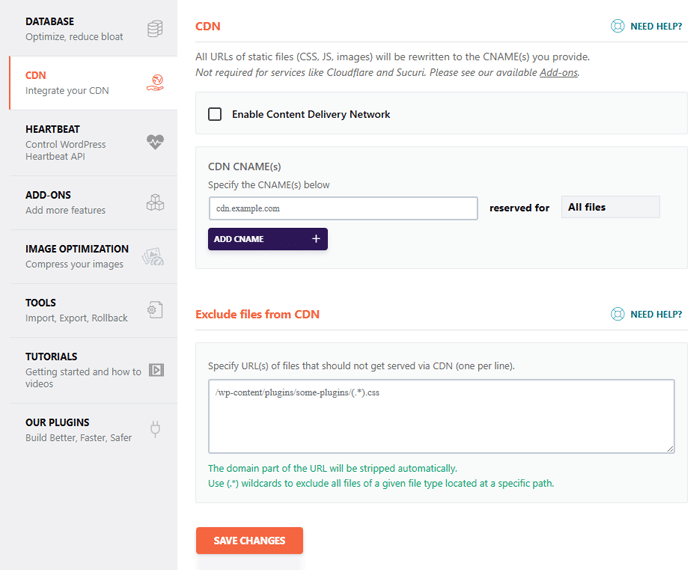
You can either integrate your own CDN from the CDN tab or you can choose RocketCDN – WP Rocket’s custom CDN. You can subscribe to the service directly from the CDN tab in WP Rocket. Learn more about configuring your CDN here.
Summary
WordPress has many plugins that not only allow you to easily create a full-featured website, but also optimize performance for a good user experience.
The above optimization plugins are a good overall fit for most websites, both in terms of compatibility and improving site performance.
If you have a WordPress site, give this guide a try and improve your page experience for all your visitors.
Need help? Hire a Developer
We only recommend products and services that we’ve reviewed and tested ourselves. Below you’ll find affiliate links to our optimization partners – If you decide to purchase their services through the links provided, we may be paid a commission at no extra cost to you.
Is your WordPress site still running slow?
We recommend finding help using one of our optimization partners. They’re a great option for website owners that want to improve performance, but don’t have the technical skill to implement optimizations.
Have a look at our partners below:
Need help? Hire a Developer
![]()
We recommend finding help on Fiverr. This is a great option for website owners that want to improve performance, but don’t have the technical skill to implement optimizations.
Visit Fiverr, register for an account, and search for a speed optimization service that matches your platform, whether it’s WordPress, Magento, Shopify, Squarespace, Opencart, etc.
Find an expert to help with your site today